Wednesday, August 26, 2015
Link/text Only Related Posts Widget For Blogger With 6 Different Styles
"Simple Related Posts Widget For Blogger" is the most frequently searched on search engines because it is a very important gadget for blogger. It helps visitors to reach more posts on your blog and hence it helps you to multiply your traffic. Related posts widget plays a role of internal linker as it link one post with other so it has a great impact on your traffic as well as seo. Because internal linking is a part of off-page seo. As this gadget is so important for blogger therefore some websites are also formed which provides related posts plugin for your blog but if a website's plugin is used then it may slow down your blog which is not good.
People wish to add related posts widget to multiply their traffic but without affecting there blog's speed so most of the bloggers use simple/link/text only related post widget because it doesn't slow down blog and boost traffic.
I also recommend to use simple/link only related posts widget because thumbnails loads so slow and visitors hate slow loading. I have shared many types of related posts widgets for blogger and in this post I am back with simple/link only related posts widget with 6 different styles.
I hope you will like this post. I would like to know how was this post so leave a comment below the post. To add this widget in your blog and start multiplying your traffic follow below steps:
Click Here To Add Simple Related Posts Widget In Blogger Mobile Site!
Step 1: Go to blogger dashboard.
Step 2: Navigate to template and click on edit html.
Step 3: Search for </head>.
Step 4: Copy code of desired related posts widget from below and paste it above </head>.
Style 1:
<b:if cond='data:blog.pageType == "item"'>
<style type='text/css'>
#related-posts {margin: 10px 5px;}
#related-posts h2 {letter-spacing: 1px;font-size: 18px; color: #222;margin-bottom: 15px;position: relative;left: 5px; top: 10px;}
#related-posts a {font-size: 14px; color: #999;text-transform: capitalize;}
#related-posts a:hover {text-decoration: none;color: #555;}
#related-posts ul {list-style-type: none; margin: 0 0 0px 0;padding: 5px;}
#related-posts ul {list-style-type: none;}
#about { float: right; font-size: 12px; }
#related-posts li {padding: 12px;border-bottom: 2px solid #fff;border-left: 5px solid #BCC2B9;background-color: #F4F4F4;}
#related-posts li:hover {background: #F4F4F4;font-weight:bold;background-color: #eee;border-left: 5px solid #188DD7;}
</style>
<script type='text/javascript'>
var relatedpoststitle="You Might Also Like Reading:";
</script>
<script src='https://rawgit.com/101Helper/docs/master/related-post.js' type='text/javascript'/>
</b:if>
Style 2:
<b:if cond='data:blog.pageType == "item"'>
<style type='text/css'>
#related-posts {margin: 13px 5px;background-color: #20DD71;}
#related-posts h2 {color: #FFFFFF;margin-bottom: 13px;left: 7px;top: 10px;font-family: Trebuchet ms;}
#related-posts a {font-size: 14px;color: #999;text-transform: capitalize;}
#related-posts a:hover {text-decoration: none;color: #555;}
#about { float: right; font-size: 12px; }
#related-posts ul {list-style-type: none;margin: 0 0 0px 0;padding: 5px;}
#related-posts li {padding: 12px;border-bottom: 3px solid #eaeaea;background-color: #FFFFFF;}
</style>
<script type='text/javascript'>
var relatedpoststitle="Related Posts:";
</script>
<script src='https://rawgit.com/101Helper/docs/master/related-post.js' type='text/javascript'/>
</b:if>
Style 3:
<b:if cond='data:blog.pageType == "item"'><style type='text/css'>
#about { float: right; font-size: 12px; }
#related-posts {margin: 10px 0px;background-color: #eee;margin-bottom: 40px;}
#related-posts h2 {letter-spacing: 1px;font-size: 18px;color: #222;margin-bottom: 10px;position: relative;left: 10px;top: 10px;}
#related-posts a {position: relative;bottom: 4px;font-size: 15px;color: #999;text-transform: capitalize;}
#related-posts a:hover {text-decoration: none;color: #555;}
#related-posts ul {list-style-image: url('https://blogger.googleusercontent.com/img/b/R29vZ2xl/AVvXsEh7_Ueuc4516YJqAE_OctC0ENB2x35wlTSnocljRFjex6PrTtzEpHZ_6-L4RIZCePvTXLQJSYdQxOYOa84nDJEOj8UJcSDVfUOlQy0xT3bO4HwJir0vuFGlvb7hl3rIEAYngh1kwGjjX0A/s1600/rsz_1rsz_icon256.png');margin: 0 0 0px 0;padding: 5px;position: relative;left: 30px;}
#related-posts li {width: 94%;}
#related-posts li:hover {font-weight:bold;}
</style>
<script type='text/javascript'>
var relatedpoststitle="You Might Also Like Reading:";
</script>
<script src='https://rawgit.com/101Helper/docs/master/related-post.js' type='text/javascript'/>
</b:if>
Style 4:
<b:if cond='data:blog.pageType == "item"'>
<style type='text/css'>
#about { float: right; font-size: 12px; }
#related-posts { margin: 10px 0px; background-color: #eee; position: relative; margin-bottom: 40px; }
#related-posts h2 { letter-spacing: 1px; font-size: 18px; color: #222; margin-bottom: 10px; position: relative; left: 10px; top: 10px; }
#related-posts a { position: relative; bottom: 5px; font-size: 15px; color: #666; text-transform: uppercase; }
#related-posts a:hover { text-decoration: none; color: #555; }
#related-posts ul { list-style-image: url('https://blogger.googleusercontent.com/img/b/R29vZ2xl/AVvXsEgwelct8zOOERcd651Uf9EVT5lgTj1-5u0YLfwlAajyhMq5pC_Vk-VaIoKKjhUSal_gbtm2ojStLNkrmgrp0updZyCbmK59xuG4auXhtIMUkxgLxocPn-AspHGlFP7SEVNgGYvyYXriWK0/s1600/rsz_logo-favicon-large.png'); margin: 0 0 0px 0; padding: 5px; position: relative; left: 30px; }
#related-posts li { padding: 0%; margin-bottom: 7px; width: 94%; border-bottom: 1px dashed #666; }
#related-posts li:hover { font-weight:bold; }
</style>
<script type='text/javascript'>
var relatedpoststitle="You Might Also Like Reading:";
</script>
<script src='https://rawgit.com/101Helper/docs/master/related-post.js' type='text/javascript'/>
</b:if>
Style 5:
<b:if cond='data:blog.pageType == "item"'>
<style type='text/css'>
#related-posts h2 {letter-spacing: 1px;font-size: 18px; color: #222;margin-bottom: 15px;position: relative;left: 5px; top: 15px;}
#related-posts a {font-size: 14px; color: #fff;text-transform: capitalize;text-decoration:none;}
#related-posts ul {list-style-type: none; margin: 0 0 0px 0;padding: 5px;}
#related-posts li {border-radius: 2px;padding: 10px;margin-top: 3px;background-color: #777777; border: 1px solid #777777;}
#about { float: right; font-size: 12px; }
#related-posts li:hover {background: #F4F4F4;border: 1px solid #3079ED;background-color: #4D90F0;}
#related-posts { padding-bottom: 45px; }
</style>
<script type='text/javascript'>
var relatedpoststitle="You Might Also Like Reading:";
</script>
<script src='https://rawgit.com/101Helper/docs/master/related-post.js' type='text/javascript'/>
</b:if>
Style 6:
<b:if cond='data:blog.pageType == "item"'>
<style type='text/css'>
#related-posts { padding-bottom: 45px; }
#related-posts h2 {letter-spacing: 1px;font-size: 18px; color: #222;margin-bottom: 15px;position: relative;left: 5px; top: 12px;}
#related-posts li {font-size: 15px;}
#about { float: right; font-size: 12px; }
#related-posts a,a:hover {text-decoration:none;color: #2288bb;}
</style>
<script type='text/javascript'>
var relatedpoststitle="You Might Also Like Reading:";
</script>
<script src='https://rawgit.com/101Helper/docs/master/related-post.js' type='text/javascript'/>
</b:if>
Step 5: Now search for below piece of code:
<div class='post-footer'>
Step 6: Copy below code and paste it just above the above code:
<b:if cond='data:blog.pageType == "item"'><div id='related-posts'> <b:loop values='data:post.labels' var='label'> <b:if cond='data:label.isLast != "true"'> </b:if> <b:if cond='data:blog.pageType == "item"'> <script expr:src='"/feeds/posts/default/-/" + data:label.name + "?alt=json-in-script&callback=related_results_labels&max-results=6"' type='text/javascript'/></b:if></b:loop>
<script type='text/javascript'> var maxresults=6; removeRelatedDuplicates(); printRelatedLabels("<data:post.url/>"); </script><a href="http://101helper.blogspot.com/2015/08/linktext-only-related-posts-widget-for-blogger.html" id="about" style="color: #888;">101Helper</a></div></b:if>
You may find <div class='post-footer'> several times but you have to paste above code above the second one.
Step 7: Click on save template and you are done!
Note: Make sure to label every post of your blog otherwise this widget will not work.
Customization:
Number of posts:
To change number of posts change 6 with desired number of posts in maxresults=6
Title of related posts:
To change title of your related posts widget just replace "You Might Also Like Reading" with your desired title.
How To Show Simple Related Posts Widget In Blogger Mobile Site Under Posts?
If you are wishing to show show a simple related posts widget below your posts in mobile view too then follow below steps. Don't worry it won't effect your mobile site speed! You don't need to follow all steps again, once you have installed this widget in your desktop site then you just have to use the code of step 6 with a little bit changes(I have made). So follow below steps
Step 1: Optimize your blog for mobiles first (Use Custom Blogger Mobile Template).
To use blogger custom template go to Blogger Dashboard > Template > Click on Blogger Mobile Settings Icon as shown in below picture.
Now switch your mobile template to Custom.
Step 2: Copy below code:
<b:if cond='data:blog.isMobile == "true"'><b:if cond='data:blog.pageType == "item"'><div id='related-posts'> <b:loop values='data:post.labels' var='label'> <b:if cond='data:label.isLast != "true"'> </b:if> <b:if cond='data:blog.pageType == "item"'> <script expr:src='"/feeds/posts/default/-/" + data:label.name + "?alt=json-in-script&callback=related_results_labels&max-results=6"' type='text/javascript'/></b:if></b:loop>
<script type='text/javascript'> var maxresults=6; removeRelatedDuplicates(); printRelatedLabels("<data:post.url/>"); </script><a href="http://101helper.blogspot.com/2015/08/linktext-only-related-posts-widget-for-blogger.html" id="about" style="color: #888;">101Helper</a></div></b:if></b:if>
Step 3: Go to template > Edit Html and find below piece of code in your template:
<b:if cond='data:top.showMobileShare'>
Step 4: After finding <b:if cond='data:top.showMobileShare'> scroll a little bit up and find below code:
<div class='post-footer'>
Step 5: Just above paste the copied code(step 2).
Step 6: Click on save and you are done!
I hope you like this post and it was helpful to you. If you have any question ask me in comments. Share this post and help others. Follow and subscribe for latest blogging tutorials, gadgets, widgets, tips and tricks. Thanks for visiting 101Helper.
Search tags: Simple related posts widget blogger,Related posts widget for blogger,stylish related posts widget,links,text only related posts widget,101helper blogger gadgets
Monday, August 17, 2015
How To Add "Read More" Link In Blogger After Post
All though "Read More" button has no effect on seo but it can help you speed up your blog. You can add this to your posts very easily, there is no need to touch code. It is done when you have completed your post.
Also Read: How To Customize Read More Link/Button In Blogger
In this post I will show you how to add "Read More" in posts by using jump break. So follow below steps:
Step 1: Go to blogger dashboard and write a new post or edit an existing one which doesn't have read more button.
Step 2: Choose the location or area of post which you want to show before "Read More"button or find the position where you want to place jump break.
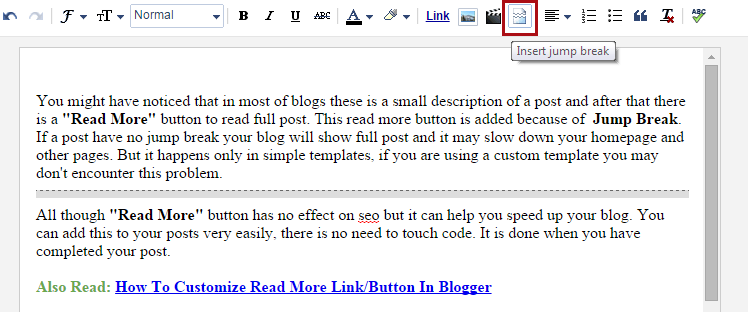
Step 3: Click after that area which you have chosen to show and click on Insert jump break button as shown in below image:
Step 4: Click on publish and open your homepage to see changes.
101Helper grow. Follow and subscribe to get instant news about new posts.
Search Tags: How To Add "Read More" Link In Blogger Post, Read morebutton in blogger posts,Small post description and read morebutton,blogging tutorials 101helper
Saturday, August 15, 2015
How To Fix "headline and datepublished missing and required" In Blogger
Since Google is updating posting schema and search results so frequently, bloggers and webmasters are having trouble to cope with it. Previously Structured Data Testing Tool was detecting following errors:
(1). image_url:
(2). postId:
(3). blogId:
To fix above problems read How To Fix Google Webmaster Tools Errors In Blogger
But now two new errors are encountered which are:
(1). headline: missing and required
(2). datepublished: missing and required
In this post I will show you how to fix these errors in blogger. So follow below steps to fix your errors. I am starting from "headline: missing and required" first.
Method 1:How To Fix "headline: missing and required" In Blogger:
Step 1: Go to blogger dashboard and navigate to template.
Step 2: Click on Edit Html to Edit your template.
Step 3: Click inside the code and search for below piece of code:
<h1 class='post-title entry-title' itemprop='name'>
Or if you don't find it search for below one:
<h2 class='post-title entry-title' itemprop='name'>
Step 4: Change 'name' to 'headline' in the code as shown in below image:
You will find the above code two times or more then two times, make sure to change 'name' to 'headline' in all of these codes.
Step 5: Save your template and test your blog again using Structured Data Testing Tool.
How To Fix "datepublished: missing and required" In Blogger:
If you do it manually it will need hard work and it would be difficult for you so I found an alternative method to fix this error which is much easier then other methods. So follow below steps to fix 'datepublished: missing and required' in your blog.
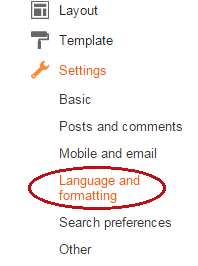
Step 1: Go to blogger dashboard > settings and select sub-option(Language and formatting):
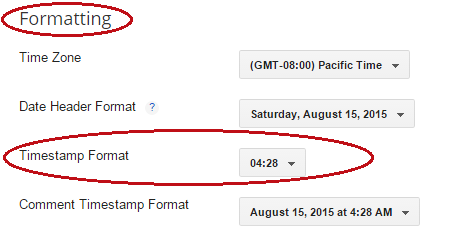
Step 2: Find Formatting and Timestamp Format.
Step 3: Change time format from default to 8/15/2015 04:33:50 AM(Month/Date/Year Time AM) format as show in below image:
Step 4: Click on save settings and go to layout.
Step 5: On the layout page edit blog posts.
Step 6: Check/Mark both date and time options in post page options as shown in below picture:
Step 7: Change time format to 8/15/2015 04:33:50 AM(Month/Date/Year Time AM) as you did in the settings above(step 3).
Step 2: Find Formatting and Timestamp Format.
Step 3: Change time format from default to 8/15/2015 04:33:50 AM(Month/Date/Year Time AM) format as show in below image:
Step 4: Click on save settings and go to layout.
Step 5: On the layout page edit blog posts.
Step 6: Check/Mark both date and time options in post page options as shown in below picture:
Step 7: Change time format to 8/15/2015 04:33:50 AM(Month/Date/Year Time AM) as you did in the settings above(step 3).
It should be like above image.
Step 8: Click on save and you are done.
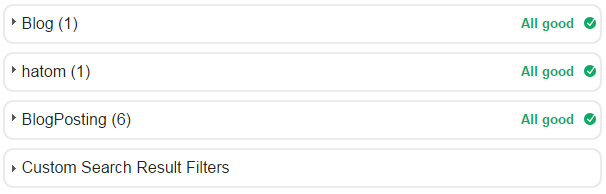
Once again check your blog with Structured Data Testing Tool, I am sure this time you will see All good!
If you still have errors in your webmaster testing tools then you have to do all this manually so follow below steps to add codes manually.
Method 2:Fixing "headline and datepublished missing and required" in blogger Manually!
Step 1: Go to your template and edit it.
Step 2: Search for below code:
<div class='date-posts'><div class='post-outer'><div class='post hentry uncustomized-post-template' itemscope='itemscope' itemtype='http://schema.org/BlogPosting'>
Step 3: Copy below code and paste it below the above code:
<a class='timestamp-link' expr:href='data:post.url' rel='bookmark' title='permanent link'><abbr class='published' expr:title='data:post.timestampISO8601' itemprop='datePublished'><span class='updated'><data:post.dateHeader/>T<data:post.timestamp/></span></abbr></a>
Step 4: Now search for this code:
<div class='post hentry' itemprop='blogPost' itemscope='itemscope' itemtype='http://schema.org/BlogPosting'>
Step 5: After finding above code just below it paste this one:
<a class='timestamp-link' expr:href='data:post.url' rel='bookmark' title='permanent link'><abbr class='published' expr:title='data:post.timestampISO8601' itemprop='datePublished'><span class='updated'><data:post.dateHeader/>T<data:post.timestamp/></span></abbr></a>
Step 6: Now search again for the below code:
<meta expr:content='data:post.canonicalUrl' itemprop='url'/>
You may find this code 2 or 3 times
Step 7: Add the below code below each of the above codes(step 6):
<a class='timestamp-link' expr:href='data:post.url' rel='bookmark' title='permanent link'><abbr class='published' expr:title='data:post.timestampISO8601' itemprop='datePublished'><span class='updated'><data:post.timestamp/></span></abbr></a>
Step 8: Click on save and you done!
Important Note: Make sure to follow step 5,6 and 7 in the first method of fixing these errors!
If your blog have other errors like img_url, postid, blogid then read How To Fix Google Webmaster Tools Errors In Blogger
If you still see any problem you can discuss it with me in comments or by contacting me.
If this post helped you then please take a second to share it with others. Follow ans subscribe for latest posts updates. Keep visiting 101Helper :)
Search Tags: How to fix Structured data tools errors in blogger,blogid,postid,headline,image_url,datepublished error fixing tutorial for blogger,Google webmaster tools tutorials for blogger 101helper.blogspot.com
Friday, July 31, 2015
How To Use Google Adwords To Increase Blogger Blog Traffic
As far as I am concerned with blogging, Google Adwords is the only ad network which I prefer best to advertise a blogger blog. Although I get my whole traffic from search engines but in the beginning I used Google Adwords to promote my blog. You can also use Google Adwords to promote your blog and help it to start running.
Why Google Adwords?
Only few of us know how to use Google adwords and its good for blogger because of its policy which is to pay only when you get clicks. It means you don't have to pay a fixed amount to advertise your blog but you choose your own budget and also pay per click amount. Moreover if you don't get clicks and your site is against Google Adword's policy you will get your money back. It has tremendous features which makes it better than other advertising networks.
Payment Methods:
- Credit Or Debit card.
- Bank Account.
Mobile App:
How To Use Google Adwords For Blogger Blog?
Well it seems that using Google Adwords is very difficult to understand but it isn't so. Even a beginner can start promoting his blog with it, all you need is a way to pay and follow this tutorial. So lets begin, follow below steps to start promoting your blog through Google Adwords.
Step 1: Go to blogger dashboard and navigate to Campaigns.
Step 2: Click on Start Now.
Step 3: Wait for the page to load and refresh it if its not showing anything.
Step 4: Type your Email, Select your country, Select your time zone and your currency(in which you will pay for advertising).
After selecting desired options click on save and continue to proceed away. Congratulations! your adwords account has been created.
You Might Also Like Reading:
How To Create My First Ad Campaign In Google Adwords?
Read and follow below steps to create your first campaign and start promoting your blog/website.
Step 1: Click on Create Your First Campaign.
Step 2: Give a title to your campaign, Select the type of ads either Standard or All features, Choose networks and devices(on which ads will show up e.g computer, tablets, mobile etc).
Step 3: Scroll down the page and move to Locations, here you have to choose the countries in which you would like to show your ads. Choose All the countries or your own country or if you want to target specific country then choose Let me select. If you choose Let me select then type the name of the country in the search box below and select it.
After location you have another option below "Languages" so check the languages in which you would like to show your ads. Be sure that the languages you select aren't only languages but these languages will decide that on which Google domain your ads will appear.
Say that you choose English, now your ads will be shown on the Google domains which have English language e.g Google.co.uk, Google.com, Google.pk.
It doesn't mean that your ads will not be shown in the countries you choose.
Step 4: In step 4 there are three things that you have to deal with, one is to choose a bid strategy, budget for your ads and other is to ad extension to your ads.
Choose Basic options in bid strategy because Advanced options are difficult to understand.
- In bid strategy area you have two options:
- Adwords will set my bids to help maximize clicks within my target budget.
- I'll manually set my bids for clicks.
Choose I'll manually set my bids for clicks because if you let Google to choose bids for you then you will get more and more traffic but have to pay high rates.
![]() |
| How to set bids in Google Adwords? |
After choosing I'll manually set my bids for clicks you will have two options:
- Default bid.
- Budget.
In the default bid type the rate which you will pay for each click(PPC).
Tip: For a quick boost in traffic while spending lowest amount set $0.02 as default bid.
In budget area type $1 or $2 no matter what you type but it is just a limit in which you will pay Google Adwords. For example if you set a budget of $1 and default bid $0.02 then you will get 20 clicks for 1 dollar and after that your ad will stop running because your daily budget is consumed. If you don't get 20 clicks in a day then your remaining budget will be used next.
What Is Ad Extension And How To Use It?
Ad extension is an optional feature to include relevant business info with your ads e.g location, sitelinks, call info.
So if you want to use this feature just check any of the given option and follow instructions to proceed away.
Step 5: Click on Save and continue and you have successfully created your first campaign now its time to create an ad group which will include you ads so follow next step.
Step 6: Give a name to your ad group and below it design your ad look. You can see a preview of your ad on the page.
Step 7: Scroll down and write your keywords in the given text area as shown in below photo. Write 10-20 keywords on after other.
Step 8: After writing keywords click on Save and continue to billing as shown in below image:
Setting Up Billing Settings In Google Adwords:
Step 9: Select your country and click on Continue.
What Is Ad Extension And How To Use It?
Ad extension is an optional feature to include relevant business info with your ads e.g location, sitelinks, call info.
So if you want to use this feature just check any of the given option and follow instructions to proceed away.
Step 5: Click on Save and continue and you have successfully created your first campaign now its time to create an ad group which will include you ads so follow next step.
Step 6: Give a name to your ad group and below it design your ad look. You can see a preview of your ad on the page.
Step 7: Scroll down and write your keywords in the given text area as shown in below photo. Write 10-20 keywords on after other.
Step 8: After writing keywords click on Save and continue to billing as shown in below image:
Setting Up Billing Settings In Google Adwords:
Step 9: Select your country and click on Continue.
Step 10: Select account type as individual and fill up your info. E.g your name, address, phone number etc and scroll down the page.
Step 11: Select Automatic payments in How you pay option and the payment method is chosen in step 9(you can pay with either credit or debit card or by bank account depending on your country).
Fill up all your info carefully and choose your billing language also.
Step 12: Check the Yes, I agree the above terms and conditions and click on complete sign up.
Congratulations! you are done successfully. You can read more about Google adwords below e.g how to create more campaigns or edit the existing one, how to change billing info and account info and also how to cancel your account any time.
How To Make Changes In Settings?
Although payment settings and other settings are configured and saved at the time of setting up account but later you can change your payment as well as account settings. To change your account settings just click on the settings button on the top-right-corner of the page.
To create more ads and ad-groups just navigate to campaigns and click on +CAMPAIGN
I hope you like this post if you have any question ask me in comments or contact me. Follow through social networks and subscribe to Newsletter for E-mail notifications about new posts. Share this post with others and help me spread my blog.
Search Tags: How to Use Google Adwords, Google adwords help, Google adwords for blogger, Step by step tutorial Google adwords, Increase traffic Google adwords,Get Google Adword's tips,Advertise blog low rates,101Helper blogging tutorials
Subscribe to:
Posts (Atom)