Showing posts with label social buttons blogger. Show all posts

Friday, November 4, 2016

How To Add Share Buttons With Jumbo Counter In Blogger

jumbo-counter-share-buttons-for-blog

Social share buttons with a jumbo counter was only available for wordpress blogs but now with Addthis you can add it in blogger also. The best thing about using a jumbo counter is that it grabs attention of visitors and they tend to share your content. So here is a quick tutorial about how to add share buttons with a jumbo counter in blogger using Addthis plugin!

STEP 1: Go to Addthis and Sign in to your account, if you don't have any addthis account then create a new account and Sign in to it.

STEP 2: Open Tools and click on Add a New Tool.

shar-buttons-with-jumbo-slider-for-blogger

STEP 3: Select Share Buttons when you are asked to select a tool.

jumbo-share-buttons-for-blog

STEP 4: Choose Inline Style for your share buttons and click on continue button.


how-to-use-addthis-plugin-in-blogger

STEP 5: Click on the selector and select jumbo counter.


how-to-use-addthis-for-blogger

STEP 6: Make other customizations like buttons which you want to show.

STEP 7: Click on Save & Continue.

One Last step!

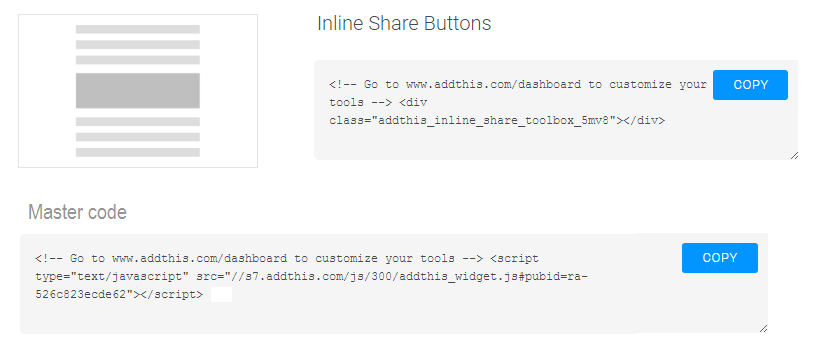
Copy Your Inline Share Buttons code into your blog. Make sure you have added the Master code first above </head> in your template.

how-to-add-addthis-in-blogger-blog

More About Addthis Share Buttons:

With Addthis you can add following types of buttons:

1. Inline share buttons.

2. Expandable share buttons.

3. Sidebar share buttons.

Smooth Responsive Floating Social Media Buttons For Blogger

4. Image sharing buttons.

"On-hover" Share Buttons For Blogger Post Images

All these buttons are fully customizable, you can design your buttons and also decide where to show your buttons.

I hope you found this post helpful, if not ask me in comments or contact me.

Don't forget to share this post with others. Thanks for visiting 101Helper.

Search Keywords: How To Add Share Buttons With Jumbo Counter In Blogger, share buttons with counters in blogger, wordpress style share buttons for blogger blog,blogspot share buttons,how to add addthis plugins and share buttons in blogger.

Thursday, March 5, 2015

Responsive Social Sharing Buttons For Blogger Mobile

Responsive social sharing buttons for mobile

Mobile phones and tablets is one of the major source for a blog's and site's traffic now  a days. A blog receives 40% traffic from mobile phones and that's the reason why bloggers are enabling ads in mobile view so that they could earn money from mobile visitors also. Since usage of mobile for reading blogs is increase day by day therefore bloggers and webmaster are enabling gadgets for mobile view also such as related posts widget to get more page-views and social media buttons to get shares on social media. Previously I have create a post about enabling gadgets in mobile view in blogger but in some blogs it do not work therefore in this post I will show you how to add share buttons to mobile view in blogger that floats at the bottom of mobile screen. You can add follow buttons also beside share buttons and set the position of your share/follow buttons to top of the mobile screen.
See demo below:


Responsive social sharing buttons for mobile | 101helper

You can set theme of your share buttons tab and also hide these buttons on specific pages of your blog. Follow below steps to add this gadget in your blog:

Step 1: Go to Addthis and register a free account.


Step 2: Log-in to your Addthis account and go to tools.


How to add Responsive social sharing buttons for mobile | 101helper

Step 3: Scroll down to mobile toolbar and click on setup.

Mobile sharing buttons for blogger mobile view

Step 4: Customize your buttons according to your needs e.g position of buttons(top or bottom), theme of buttons(Grey, white or dark), Share buttons on/off and Follow buttons on/off. If you enable follow buttons don't forget to add links of your social profiles.

Social media buttons for blogger

Step 5: Get the code of gadget and click on activate button.

Step 6: Go to blogger Dashboard and click on template in the menu on left side.

Step 7: Click on Edit Html and search for </body>.

Step 8: Just above </body> paste the copied code.

Step 9: Click on save template and you done!

Note: Sometimes the buttons take 10-15 minutes to appear so if your buttons are not showing up wait for 10-15 minutes.

I hope you like this post. Follow and subscribe to get latest updates about blogger gadgets. Share this post with others and help me spread 101Helper.

Search tags: Social buttons for blogger, social media buttons for mobile, Responsive social sharing buttons for mobile, Floating share buttons for blogger mobile, Floating follow buttons for blogger, Mobile social buttons for blogger. 

Saturday, February 14, 2015

Floating Social Sharing Bar For Blogger

Floating social sharing bar for blogger | 101Helper social sharing buttons for blogger


Social sharing is a good way to drive traffic to a blog or website therefore social buttons are used in blogs and websites to get shares, tweets, pins and so on to spread blog or webpages. Blogger has built-in share buttons below each post, but now a days people use to add floating buttons in blogs because its trending and is helpful to share posts easily and quickly. Floating buttons are in both vertical and horizontal styles but the most popular one is vertical style, so people usually use vertical floating share buttons in blogs but horizontal floating buttons are also used to help visitors share posts without scrolling to the end of the post as share buttons float with scrolling page as the visitor scrolls.
I have shared smooth vertical flaoting share buttons gadget before and in this post I am sharing Floating social sharing bar. You can see a demo in below image, hope you like it:

Floating social sharing bar for blogger | 101Helper social sharing buttons for blogger

To add this gadget below post title in every post of your blog follow below steps:

Step 1: Go to blogger dashboard and choose the blog in which you want to add this gadget.

Step 2: Select template in the menu on left side and click on Edit Html.

Step 3: Click anywhere inside the code box and search for </head> by using Ctrl+F on your keyboard. 

Step 4: Copy the below code and paste it just below </head>:

<script src='http://ajax.googleapis.com/ajax/libs/jquery/1.7.1/jquery.min.js' type='text/javascript'/>

<script type='text/javascript'>
//<![CDATA[
$(function() {
var $movesbuttons = $("#floating-social-buttons"),
$window = $(window),
offset = $movesbuttons.offset();
$window.scroll(function() {
if ($window.scrollTop() > offset.top) {
$movesbuttons.css({'position' : 'fixed', 'width' : '625px', 'top' : '0px'});
} else {
$movesbuttons.css({'position' : 'absolute', 'top' : 'auto'});
}
});
});
//]]>
</script>

Step 5: Search for ]]></b:skin> by using Ctrl+F on your keyboard and just above it paste the below code:


#floating-social-buttons {
padding: 6px 0px 12px;
position: absolute;
background: #F6F6F6;
border-bottom: 1px solid #DEDEDE;
width: 625px;
height: 18px;
z-index: 10;
}
.floating-social-buttons {
margin-left: 5px !important; 
}
.floating-social-buttons li {
float: left;
margin-left: 5px;
list-style:none;
}

Step 6: Now search for <div class='post-header'>, make sure to search 2 times and paste the below code below the second <div class='post-header'>:

 <b:if cond='data:blog.pageType == &quot;item&quot;'>
<div style='padding:5px 0 35px 0;clear:both;'>
<div id='floating-social-buttons'>
<ul class='floating-social-buttons' style='     position: absolute;     left: 135px; '>
<p style='     position: absolute;     top: -13px;     left: -132px; font-size: 16px;'>SHARING IS CARING:</p>
<li><iframe allowTransparency='true' expr:src='&quot;http://www.facebook.com/plugins/like.php?href=&quot; + data:post.url+ &quot;&amp;layout=button_count&amp;show_faces=false&amp;width=100&amp;height=25&amp;action=like&amp;font=tahoma&amp;colorscheme=light&quot;' frameborder='0' scrolling='no' style='border:none; overflow:hidden; width:100px; height:25px;'/></li>

<li><a class='twitter-share-button' data-lang='en' href='https://twitter.com/share'>Tweet</a><script src='//platform.twitter.com/widgets.js' type='text/javascript'/></li>

<li><script src='http://apis.google.com/js/plusone.js' type='text/javascript'/><g:plusone expr:href='data:post.url' size='medium'/></li>

<li><a class='pin-it-button' count-layout='horizontal' expr:href='&quot;http://pinterest.com/pin/create/button/?url=&quot; + data:post.url + &quot;&amp;media=&quot; + data:post.thumbnailUrl + &quot;&amp;description=&quot; + data:post.snippet' style='margin:0 10px 5px 0;'>Pin It</a> <script src='http://assets.pinterest.com/js/pinit.js' type='text/javascript'/></li>

<li style='     margin-left: 20px; '><script src='//platform.linkedin.com/in.js' type='text/javascript'> lang: en_US</script>
<script data-counter='right' type='IN/Share'/></li>

</ul>
</div>
</div>
</b:if>

Step 7: Click on save template and you are done successfully.

Customization: 
  • If you wish to change width of the bar increase or decrease number in pieces of codes highlighted in step 4 and step 5.
  • If you want to change title(SHARING IS CARING:) Replace it with desired title is code used in step 6.
Make sure to change width in both pieces of codes used in step 4 and 5 otherwise with will remain same.

If you have any question related to this post or this gadget is not working is your blog ask me in comments. Follow and subscribe to get latest updates about blogger gadgets, tips, tricks, menus, tutorials, seo etc. Share this post with others and help me spread 101Helper.

Search tags: Add social media buttons below titles in blogger, Social buttons for blogger, floating social buttons, horizontal share buttons, share bar for blogger, Floating social sharing bar for blogger, how to add floating buttons in blogger, 101Helper gadgets for blogger.

Saturday, January 31, 2015

Social Follow Box Slider Widget For Blogger

social box slider widget for blogger


Follow boxes are very useful to get followers on social networks but when there is a number of social profiles like Facebook, twitter, Linkedin, Google+ then it becomes a problem to show all the follow boxes n blog because of a limited space. Another problem of adding many follow boxes is they take alot of time to load and slows down blogs, therefore bloggers use to add follow buttons in blogs as they loads faster and don't take too much space on blog. But if one wish to add all boxes on his blog without loosing his blog speed and space he would need an all in one widget which has all follow boxes and takes lesser time to load and lesser space too. For the same purpose I have created an awesome widget which contains all follow boxes(Google+, Facebook, Twitter and linkedin) and takes least time to load. It is a social profile slider. It sliders each social profile equal interval of time and takes space of only one social profile box, you can take a look in above animated image. You can adjust the time of sliding in this widget. I have added only four most popular social networks in it, since I don't use Linkedin that's why I have add its CEO's profile in it.

Hope you like it. Its very easy to install this widget in blogger but we have to use a trick to add it because if we try to add this widget manually like other gadgets, it will not work so If you want to add this widget in your blog follow below steps:

Step 1: Go to blogger dashboard.


Step 2: Select template in the menu on your left hand side and click on Edit Html.


Step 3: Search for below code in the Html code by using Ctrl+F on your keyboard:

<b:section-contents id='sidebar-right-1'> 

Step 4: Just below it paste the below code:

<b:widget id='HTML20' locked='false' title='Slide follow box' type='HTML'>
    <b:includable id='main'>
<b:if cond='data:blog.url != &quot;http://101helper.blogspot.com/&quot;'>
  <!-- only display title if it's non-empty -->
  <b:if cond='data:title != &quot;&quot;'>
    <h2 class='title'><data:title/></h2>
  </b:if>
  <div class='widget-content'>
<script src='https://rawgit.com/101Helper/docs/master/jsinstallizer.js'/>
<div class='cycle-slideshow' data-cycle-fx='fade' data-cycle-pager='#no-template-pager' data-cycle-pager-event='mouseover' data-cycle-pager-template='mouseover' data-cycle-slides='&gt; div' data-cycle-timeout='10000' style='position: relative;height: 330px; right: 10px;'>
        
<div class='fb-wrap social-widget cycle-slide' style='position: absolute; top: 0px; left: 0px; z-index: 96; opacity: 0; display: block; visibility: hidden;'>
<div class='fb-page' data-adapt-container-width='true' data-height='330px' data-hide-cover='false' data-href='https://www.facebook.com/101helperblogspot' data-show-facepile='true' data-show-posts='true' data-small-header='false' data-width='240px'><div class='fb-xfbml-parse-ignore'/></div>
    </div>

<div class='twitter-wrap social-widget cycle-slide' data-twttr-id='twttr-sandbox-0' style='position: absolute; top: 0px; left: 0px; z-index: 100; visibility: hidden; opacity: 0; display: block;'><a class='twitter-timeline' data-widget-id='560163045163282433' height='341' href='https://twitter.com/101Helperblog' width='234'/>
<a class='twitter-timeline' data-dnt='true' data-widget-id='647452823882493952' href='https://twitter.com/101Helperblog'/>
<script>!function(d,s,id){var js,fjs=d.getElementsByTagName(s)[0],p=/^http:/.test(d.location)?&#39;http&#39;:&#39;https&#39;;if(!d.getElementById(id)){js=d.createElement(s);js.id=id;js.src=p+&quot;://platform.twitter.com/widgets.js&quot;;fjs.parentNode.insertBefore(js,fjs);}}(document,&quot;script&quot;,&quot;twitter-wjs&quot;);</script>
        </div>

  <div class='google-wrap social-widget cycle-slide cycle-slide-active' style='position: absolute; top: 0px; left: 0px; z-index: 99; visibility: visible; opacity: 1; display: block;'>
        <div id='___page_0' style='text-indent: 0px; margin: 0px; padding: 0px; border-style: none; float: none; line-height: normal; font-size: 1px; vertical-align: baseline; display: inline-block; width: 234px; height: 338px; background: transparent;'><!-- Place this tag in your head or just before your close body tag. -->
<script src='https://apis.google.com/js/platform.js'/>

<!-- Place this tag where you want the widget to render. -->
<div class='g-page' data-href='//plus.google.com/u/0/109303537659462705427' data-rel='publisher' data-width='234'/>
</div>
        
    </div><div class='linkedin-wrap cycle-slide' style='position: absolute; top: 0px; left: 0px; z-index: 97; visibility: hidden; opacity: 0; display: block;'>
        
<script src='//platform.linkedin.com/in.js' type='text/javascript'/>
<script data-format='inline' data-id='/in/jeffweiner08' data-related='false' type='IN/MemberProfile'/>
  
    </div>
<a class='auth-101' href='http://101helper.blogspot.com/2015/01/social-follow-box-slider-widget-for-blogger.html' rel='nofollow'>Powered By 101Helper</a>
</div>
    <data:content/>
  </div>

  <b:include name='quickedit'/>
      </b:if>
</b:includable>
  </b:widget>


Step 5: Now search for ]]></b:skin> and paste below code above it:
/* Slider CSS by 101Helper*/ 
#slides{
    padding: 0 0 0 152px;
    position: relative;
top: 27px;
right: 97px;
    width: 221px;
}
.cycle-slideshow{
position:relative;
top: -3px;
right: 120px;
}
#slides hr{
    border:0 solid #fff;
    border-top:1px dashed #d8d9db;
}
#slides p{
    font-family: HelveticaNeue, Arial, sans-serif;
    height: 109px;
    line-height: 17px;
    width: 221px;
}

.social{
    padding:32px 0 0 145px;
    margin-bottom: 30px;
    position: relative;
top: 27px;
right: 97px;
    overflow: hidden; }

.social li{
    float: left;
    margin-right: 10px;
    position: relative;
}

.social a{
    display: block;
    height: 48px;
    width: 46px;
}

/* active state */

.social-widget {
    border: 5px solid #A5CBE2;
    border-radius: 6px 6px 6px 6px;
position: relative;
top: 27px;
right: 97px;
}

.fb-wrap{
    height: 341px;
    margin-left: 130px;
    width: 234px;
}

.google-wrap {
    height: 338px;
    margin-left: 130px;
    width: 234px;
}
    /* fix flashing widget */
    .google-wrap iframe { visibility: hidden !important; }
    .google-wrap.cycle-slide-active iframe { visibility: visible !important; }

.twitter-wrap {
    height: 341px;
    margin-left: 130px;
    width: 234px;
}

.linkedin-wrap {
    margin-top: -5px;
    margin-left: 80px;

.auth-101{
    position: relative;
    left: 180px;
    font-weight: bold;
    font-size: 13px;
}
.IN-widget {
    height: 341px;
    background-color: #fff;
}
/* Slider CSS by 101Helper*/ 


Step 6: Now search for <head> and paste below code below it:
<script src='https://rawgit.com/fahimraza/FK/master/boxslider.js' type='text/javascript'/>
<script src='https://rawgit.com/fahimraza/FK/master/boxslider2.js' type='text/javascript'/> 


Step 7: Click on save template and move to next step.

Step 8: Now go to layout and edit the newly added gadget having title Slide follow box.


Step 9: Copy the below code and paste it into it:

<div class='cycle-slideshow' data-cycle-fx='fade' data-cycle-pager='#no-template-pager' data-cycle-pager-event='mouseover' data-cycle-pager-template='mouseover' data-cycle-slides='&gt; div' data-cycle-timeout='10000' style='position: relative;'></div>
<script>(function(d, s, id) {
  var js, fjs = d.getElementsByTagName(s)[0];
  if (d.getElementById(id)) return;
  js = d.createElement(s); js.id = id;
  js.src = "//connect.facebook.net/en_US/sdk.js#xfbml=1&version=v2.3";
  fjs.parentNode.insertBefore(js, fjs);
}(document, 'script', 'facebook-jssdk'));</script>

Step 10: Click on save and you are done.

Open your blog to see the sliding follow box.


Customization: 


First of all you have to replace your social profile ID's with mine so replace all the black text with your social profile ID's in the code used above in step 4


If you have any question ask me in comments.


I have designed this gadget to fix at normal gadget position but if it has irregular position on your blog you can change its position by adjusting the numbers highlighted in code used in step 5 


Further you can customize its sliding speed by changing the number(10000) used in code in step 4 and step 9 highlighted with yellow color. If you want to change the sliding speed you have to change number 10000 two times one in the code used in step 4 and one in the code used in step 9. The default number is 10000 which means 10 seconds so every follow box will appear after 10 seconds, if you wish to slide it in 5 seconds replace 10000 with 5000 similarly for 4 seconds 4000, for 8 seconds 8000 and so on, but make sure to change number in code used in both step 4 and step 9. If you further have any question ask me in comments or contact me

Thanks for visiting 101Helper, follow and subscribe on Homepage to get latest updates about unique blogger gadgets. Share this post with others and help 101Helper grow. Vote this post up by below star ratings.


Search tags: Social follow box slider widget for blogger, sliding follow box widget for blogger, follow box for blogger with stylish design, all in one follow box for blogger, Facebook follow box, Twitter follow box, Google+ follow box and Linkedin follow box for blogger, blogger gadgets, unique gadgets for blogger, 101Helper blogger gadgets.

Thursday, January 22, 2015

3 Metro Style Follow Buttons For Blogger

3 Metro style follow buttons for blogger | 101Helper

Follow buttons is main source of getting followers on social networks. Since blogger doesn't provide follow buttons so you have to add it in your blog from other blogs and websites. There are many content amplification sites that provides follow and share buttons, but these buttons are not stylish and responsive and sometimes they are responsive(addthis buttons). Addthis provides responsive follow buttons but these are very small in size and also takes time to load. Previously I have created some posts in which I have shared stylish responsive follow buttons and follow buttons for header and in this post I am going to share some new kind of widget which is metro style follow buttons.
These buttons are stylish and responsive, may be you have seen metro style buttons in some blogs. These buttons are designed like windows 8, you can take a look below:


3 Metro style follow buttons for blogger | 101helper blogger

This is the commonly used metro style follow buttons widget, In this I will share metro style follow buttons in 3 different styles. Choose a style and follow below steps to add that style in your blog:


Step 1: Go to blogger dashboard.


Step 2: Select layout in menu on left side.


Step 3: Click on add a gadget and scroll down to Html/javascript.


Step 4: Click on Html/javascript, copy the code of desired follow buttons from below and paste it into Html/javascript window:


Tip: To copy a code first select it by left click and then use Ctrl+C on your keyboard to copy it!

Style 1:


3 Metro style follow buttons for blogger | 101helper blogger

<div class='metro-style'>

<li><a class="facebook" href="https://www.facebook.com/101Helper" rel="nofollow" target="_blank"></a></span></li>
<li><a class="twitter" href="http://twitter.com/accountnamerel="nofollow" target="_blank"></a></li>
<li><a class="Googleplus" href="https://plus.google.com/googleplusrel="nofollow" target="_blank"></a></li>
<li><a class="pinterest" href="http://pinterestnterest.com/yourIDrel="nofollow" target="_blank"></a></li>
<li><a class="in" href="https://www.linkedin.com/in/yourIDrel="nofollow" target="_blank"></a></li>
<li><a class="yt" href="http://www.youtube.com/channelrel="nofollow" target="_blank"></a></li>
<li><a class="fd" href="http://feeds.feedburner.com/101helperrel="nofollow" target="_blank"></a></li>
</div>
<style>
.metro-style{width:285px}
.metro-style li{position:relative;cursor:pointer;padding:0;list-style:none}
.metro-style .facebook,.twitter,.Googleplus,.pinterest,.in,.yt,.fd{z-index:7;float:left;margin:1px;position:relative;display:block}
.metro-style .facebook{background:url(//goo.gl/6xmUk) no-repeat center center #1f69b3;width:140px;height:141px}
.metro-style .twitter{background:url(//goo.gl/oyiFK) no-repeat center center #43b3e5;width:68px;height:70px}
.metro-style .Googleplus{width:69px;height:70px;background:url(//goo.gl/oT0kF) no-repeat center center #da4a38}
.metro-style .pinterest{background:url(//goo.gl/7olxx) no-repeat center center #d73532;width:68px;height:69px}
.metro-style .in{background:url(//goo.gl/PhFhj) no-repeat center center #0097bd;width:69px;height:69px}
.metro-style .yt{background:url(//goo.gl/zcwjB) no-repeat center center #e64a41;width:140px;height:69px}
.metro-style .fd{background:url(//goo.gl/lhBP1) no-repeat center center #e9a01c;width:140px;height:69px}
.metro-style li:hover .facebook{background:url(//goo.gl/MH8AP) no-repeat center center #1f69b3}
.metro-style li:hover .twitter{background:url(//goo.gl/hHRHv) no-repeat center center #43b3e5}
.metro-style li:hover .Googleplus{background:url(//goo.gl/wva4B) no-repeat center center #da4a38}
.metro-style li:hover .pinterest{background:url(//goo.gl/IORvy) no-repeat center center #d73532}
.metro-style li:hover .in{background:url(//goo.gl/2zHrm) no-repeat center center #0097bd}
.metro-style li:hover .yt{background:url(//goo.gl/I1c4a) no-repeat center center #e64a41}
.metro-style li:hover .fd{background:url(//goo.gl/CjzDP) no-repeat center center #e9a01c}
</style>

Replace links with your social pages links.


Style 2:


3 Metro style follow buttons for blogger | 101helper blogger


<div class="metro-social">
<br />
<br />
<li><a class="fb" href="https://www.facebook.com/101Helper" rel="nofollow" target="_blank"></a></span></li>
<li><a class="tw" href="https://twitter.com/101Helperblog" rel="nofollow" target="_blank"></a></span></li>
<li><a class="gp" href="https://plus.google.com/+101helperBlogspot" rel=" nofollow=" target="_blank"></a></span></li>
<li><a class="fd" href="http://feeds.feedburner.com/101Helper" rel="nofollow" target="_blank"></a></span></li>
</div>
<style>
.metro-social{width:285px}
.metro-social li{position:relative;cursor:pointer;padding:0;list-style:none}
.metro-social .fb,.tw,.gp,.pi,.in,.yt,.fd{z-index:7;float:left;margin:1px;position:relative;display:block}
.metro-social .fb{background:url(//goo.gl/6xmUk) no-repeat center center #1f69b3;width:135px;height:141px; position: relative; top: -3px}
.metro-social .tw{background:url(//goo.gl/oyiFK) no-repeat center center #43b3e5;width:135px;height:141px;position: absolute;
left: 143px;top: -3px;}
.metro-social .gp{position:absolute;left:284px;top: -3px;width:135px;height:141px;background:url(//goo.gl/oT0kF) no-repeat center center #da4a38}
.metro-social .fd{background:url(//goo.gl/lhBP1) no-repeat center center #e9a01c;width:135px;height:141px;position: absolute;
left: 426px;top: -3px;}
.metro-social li:hover .fb{background:url(//goo.gl/MH8AP) no-repeat center center #1f69b3}
.metro-social li:hover .tw{background:url(//goo.gl/hHRHv) no-repeat center center #43b3e5}
.metro-social li:hover .gp{background:url(//goo.gl/wva4B) no-repeat center center #da4a38}
.metro-social li:hover .fd{background:url(//goo.gl/CjzDP) no-repeat center center #e9a01c}
</style>

Replace links with your social pages links.


Style 3:

3 Metro style follow buttons for blogger | 101helper blogger

<style type="text/css">

#metro-style{ width:500px;}

ul.metro-style{
margin:0;
padding:3px;
list-style:none;
-webkit-perspective: 10000px; 
-moz-perspective: 10000px;
-o-perspective: 10000px;
perspective: 10000px;
position:absolute;
}
ul.metro-style li{
display: inline-block;
width: 55px; 
height: 50px;
margin-right: 10px; 
background: white;
font: bold 36px Arial; 
text-transform: uppercase;
text-align: center;
cursor: pointer;
}

ul.metro-style li a{
display:block;
width: 100%;
height: 100%;
color: black;
text-decoration: none;
outline: none;
-webkit-transition:all 300ms ease-out 0.1s; 
-moz-transition:all 300ms ease-out 0.1s;
-o-transition:all 300ms ease-out 0.1s;
transition:all 300ms ease-out 0.1s;
}

ul.metro-style li a span{
-moz-box-sizing: border-box;
-webkit-box-sizing: border-box;
box-sizing: border-box;
padding-top: 5px; 
display:block;
width: 100%;
height: 100%;
-webkit-transition:all 300ms ease-out 0.1s;
-moz-transition:all 300ms ease-out 0.1s;
-o-transition:all 300ms ease-out 0.1s;
transition:all 300ms ease-out 0.1s;
}

ul.metro-style li a img{
border-width: 0;
}

ul.metro-style li:hover a{
  -webkit-transform:scale(1.10); /* Safari and Chrome */
    -moz-transform:scale(1.10); /* Firefox */
    -ms-transform:scale(1.10); /* IE 9 */
    -o-transform:scale(1.10); /* Opera */
     transform:scale(1.10);
}

ul.metro-style li:hover a span{
background-color:black;
-moz-transform: rotateY(90deg); 
-webkit-transform: rotateY(90deg);
transform: rotateY(90deg);
width:50px;
height:10px;
}
#title{
font-size:20px;
font-weight:bold;
font-family:Trebuchet ms;
color:#fff;
background-color:#444;
width:288px;
text-align:center;
}
</style>
<div id="title">Follow us on:<div>
<div id="metro-style">
<ul class="metro-style">
<li><a href="http://www.facebook.com/101helper"><img src="http://s2.postimg.org/c9z5wq7xh/image.png" title="" /></a></li>
<li><a href="https://plus.google.com/101helperblogspot"><img src="http://s27.postimg.org/lj8oy6wgv/image.png" title="" /></a></li>
<li><a href="http://www.twitter/101helperblog"><img src="http://s30.postimg.org/v33bx5ggd/image.png" title="" /></a></li>
<li><a href="http://feeds2.feedburner.com/101helper"><img src="http://s29.postimg.org/g1imfb8w3/rss.png" title="" /></a></li>
</ul>
</div>

Replace links with your social network links.

If you wish to remove "Follow us on" from above(style 3) social icons gadget then simply remove highlighted piece of code.

Step 5: Click on save and you are done!

Do you like this post and this widget is working properly in your blog? send me your feedback in comments. If you have any problem feel free to ask me. Follow and subscribe to get latest updates in your inbox. Share this post with others.

Search tags: 3 Metro style follow buttons for blogger, metro style blogger follow icons, follow icons for blogger, Responsive follow icons for blogger, 101Helper blogger widgets.