Mobile screen being small can't hold a wide horizontal menu so people add vertical menu for mobile site specially bloggers do so but there is a simple way of install a horizontal menu in blogger mobile site that is making a scrollable menu so it will show some tabs of the menu and others can be seen by touching and scrolling. As you know that almost everyone is now using a touch screen mobile so it is a good menu for your mobile site. So in this post I am going to share 4 different types of horizontal scrolling menus. Follow below steps to add any of the menu in your blog's mobile site.
Live Demo (Open In Mobile For Best Experience)
How To Add Horizontal Scrolling Menu For Blogger Mobile Site?
Step 1: Go to blogger and open Layout.
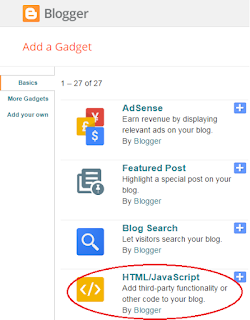
Step 2: Add a gadget just above your "Blog Posts Gadget" as shown in below image and click on Html/Javascript.
Note: If you are not able to add gadget above Blog Posts then simply add it in sidebar and drag it above Blog Posts because its important to keep it there
Step 3: Copy code of desired menu from below and paste it into Html/Javascript window you just opened in step 2.
Simple Scrollable Nav Without Logo.
<style>
.nav-scroll {
background-color: #333;
overflow: auto;
white-space: nowrap;
position: relative;
}
.nav-scroll a {
display: inline-block;
color: white;
text-align: center;
padding: 14px;
text-decoration: none;
}
.nav-scroll a:hover {
background-color: #777;
}
</style>
<div class="nav-scroll">
<a href="https://www.blogger.com">Home</a>
<a href="#news">News</a>
<a href="#contact">Contact</a>
<a href="#about">About</a>
<a href="#support">Support</a>
<a href="#blog">Blog</a>
<a href="#tools">Tools</a>
<a href="#base">Base</a>
<a href="#custom">Custom</a>
<a href="#more">More</a>
<a href="#logo">Logo</a>
<a href="#friends">Friends</a>
<a href="#partners">Partners</a>
<a href="#people">People</a>
<a href="#work">Work</a>
</div>
Horizontal Scroll Nav With Scrollable Logo.
<style>
.nav-scroll {
background-color: #333;
overflow: auto;
white-space: nowrap;
position: relative;
}
.nav-scroll a {
display: inline-block;
color: white;
text-align: center;
padding: 14px;
text-decoration: none;
}
.nav-scroll a:hover {
background-color: #777;
}
.nav-scroll img {
width: 100px;
float: left;
height: 48px;
background: #fff;
}
</style>
<div class="nav-scroll">
<img alt="logo" src="https://www.servicetrade.com/wp-content/uploads/2016/04/your-logo-here.png"/>
<a href="https://www.blogger.com">Home</a>
<a href="#news">News</a>
<a href="#contact">Contact</a>
<a href="#about">About</a>
<a href="#support">Support</a>
<a href="#blog">Blog</a>
<a href="#tools">Tools</a>
<a href="#base">Base</a>
<a href="#custom">Custom</a>
<a href="#more">More</a>
<a href="#logo">Logo</a>
<a href="#friends">Friends</a>
<a href="#partners">Partners</a>
<a href="#people">People</a>
<a href="#work">Work</a>
</div>
Horizontal Scroll Nav With Fixed Logo On Left.
<div class="nav-mob">
<img alt="brand" id="brand" src="https://www.servicetrade.com/wp-content/uploads/2016/04/your-logo-here.png"/>
<div class="nav-scroll">
<a href="https://www.blogger.com">Home</a>
<a href="#news">News</a>
<a href="#contact">Contact</a>
<a href="#about">About</a>
<a href="#support">Support</a>
<a href="#blog">Blog</a>
<a href="#tools">Tools</a>
<a href="#base">Base</a>
<a href="#custom">Custom</a>
<a href="#more">More</a>
<a href="#logo">Logo</a>
<a href="#friends">Friends</a>
<a href="#partners">Partners</a>
<a href="#people">People</a>
<a href="#work">Work</a>
</div></div>
<style>
#brand {
position: static;
float: left;
width: 105px;
height: 50px
}
.nav-scroll {
background-color: #333;
overflow: auto;
white-space: nowrap;
position: relative
}
.nav-scroll a {
display: inline-block;
color: white;
text-align: center;
padding: 14px;
text-decoration: none
}
.nav-scroll a:hover {
background-color: #777;
}
.nav-scroll img {
width: 100px;
float: left;
height: 48px;
background: #fff
}
.nav-mob {
position: relative;
}
</style>
Horizontal Scroll Nav With Fixed Logo On Top.
<div class="nav-mob">
<div id="slogo">
<img alt="logo" src="https://www.servicetrade.com/wp-content/uploads/2016/04/your-logo-here.png" /></div>
<div class="nav-scroll">
<a href="https://www.blogger.com">Home</a>
<a href="#news">News</a>
<a href="#contact">Contact</a>
<a href="#about">About</a>
<a href="#support">Support</a>
<a href="#blog">Blog</a>
<a href="#tools">Tools</a>
<a href="#base">Base</a>
<a href="#custom">Custom</a>
<a href="#more">More</a>
<a href="#logo">Logo</a>
<a href="#friends">Friends</a>
<a href="#partners">Partners</a>
<a href="#people">People</a>
<a href="#work">Work</a>
</div></div>
<style>
.nav-mob {
position: relative;
}
#slogo img {
float: none;
width:100px
}
#slogo {
position: static;
width: 100%;
text-align: center;
padding: 2px 0px;
background: #eaeaea
}
.nav-scroll {
background-color: #333;
overflow: auto;
white-space: nowrap;
position: relative
}
.nav-scroll a {
display: inline-block;
color: white;
text-align: center;
padding: 14px;
text-decoration: none
}
.nav-scroll a:hover {
background-color: #777
}
.nav-scroll img {
width: 100px;
float: left;
height: 48px;
background: #fff
}
</style>
Step 4: Save the gadget and note its ID or name it so that you can find it in your template for next steps.
Read: How To Find ID Of A Widget In Blogger
Step 5: Go to template and click on Edit Html.
Step 6: Find your "Mobile Nav Gadget" in your template you just added in above steps with the help of its ID or name using Ctrl + F on your keyboard. You can directly jump to your gadget also.
Step 7: After finding the gadget copy below piece of code and paste it after locked='false' as shown in below image:
mobile="only"
Step 8: Save your template and again go to Blogger > Template > Mobile.
Step 9: Change Default template to Custom and click on Save.
That's it. Now open your mobile site in your mobile to see your menu working.
I hope you liked this tutorial, for more menu tutorials go to Blogger menus
Thanks for visiting 101Helper, Share this tutorial with others.
Search Keywords: Horizontal Scrolling Menu For Blogger Mobile Site, menu for blogger mobile site,pure css menu for blogspot blog,how to add css,javascript menu in blogger mobile view,101helper menus for blogger,blogging tutorials.


