Saturday, July 30, 2016

How To Upgrade To Domain Without Losing Rank,shares,traffic - Blogger

how to add custom domain in blogger 101helper


Upgrading to a domain is common now a days and people usually upgrade after successful blogging. Only a few people buy domains without blogging they directly start from domains but most of people do blogging first and after earning some amount from blog, they spend this amount to upgrade their blog and it is a good step too because it improves image of a site online, people trust it more and traffic is also increased. But after upgrading to a domain most of people are confused about further steps to be taken, some of these steps are how to replace all my links in Google Search Results, How to improve traffic not lose traffic, How to maintain rank after buying a domain etc. So in this post I am going to show you how to replace all the links in Google Search Results and improve traffic and how to upgrade to a domain without losing rank and shares.


Why Do I Replace Links In Google Search Results After Buying A Domain?

Many people think that after upgrading to a domain from blogger, you need to submit your new site URL and Sitemap to Webmaster tools but its not right because it will not replace the existing blogger URLs in search results instead of it new URLs will be indexed and your site could be considered as Spam and could be penalized. So after upgrading a domain you need to replace all the existing links not index new links. It will benefit you in many ways like it will not let you lose your traffic, your rank and your visitors will also recognize that you have upgraded to a domain name. Moreover your google+ recommendations will also be transferred from your blogspot to your domain links.

How To Replace Links In Google Search Results After Buying A Domain?

STEP 1: SUBMIT NEW DOMAIN TO WEBMASTER TOOLS

Step 1: Go to Google Webmaster tools.

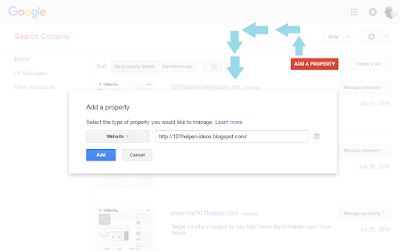
Step 2: Click on   Add A Property   and add your site URL

how to submit url to google webmaster tools

Step 3: Verify your site by adding the meta tag provided by Google to your blog template.

verify site in google webmaster tools

Step 4: Go to Webmaster tools > Crawl > Sitemaps and submit your new domain's sitemap.

STEP 2: LINK YOUR BLOG TO YOUR DOMAIN IN WEBMASTER TOOLS

Step 1: Open your blog(not domain) in webmaster tools which you want to link to your domain in order to replace its links with the new domain links in search results.

Step 2: On the top right of the page click on settings icon and open Change of Address.


how to replace links in google search results

Step 3: Follow the instructions mentioned on the Change of Address page.

1. Pick your new site from the list.
2. Confirm that 301-redirects work properly.
3. Check that verification methods are still present.
4. Submit the change of address request.

how to upgrade to custom domain without losing traffic

Your request will be processed soon and your blog links in Google Search Results will be soon replaced with the new domain links. Unfortunately in Bing and Yandex webmaster tools doesn't allow change of address so you need to delete the old blog and submit your new domain in webmaster tools.

How To Submit Blogger Sitemap To Yandex?

How To Submit Blogger Sitemap To Bing Webmaster Tools?

You are done successfully. Now you just need to make changes in your Robots.txt such as adding new sitemap URL.

Read How To Add Custom Robots Text In Blogger?

You can withdraw change of address anytime by clicking on Withdraw on the change of address page.


Any questions? Ask in the comments below! Share this post with others and follow us on social media for updates.

Search Tags: how to replace blog links with new domain links in SERP(google search results),how to add custom domain in blogger without losing traffic,rank and shares, webmaster tools tutorials for blogger(blogspot), how to submit new domain url in webmaster tools

Friday, July 22, 2016

Swiper Featured Posts Widget For Blogger Mobile Site

featured posts swiper widgets for blogger mobile site

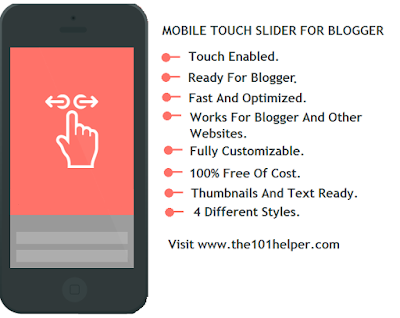
This is a quick post about featured post swiper for blogger mobile site. So in this post I am going to share different types of mobile swipers and there features. I hope you will like them. Other bloggers and webmasters are requested to not copy and share this code without 101helper tag below each code, if found to be copied it will be against 101Helper's copyright violation and action will be taken!

Featured Posts Mobile Swiper Features:

1. It is free of cost.
2. 4 different designs.
3. Fully customizable.
4. Doesn't affect blog speed.
5. 100% optimized for all mobile screens.
6. Unlimited featured posts can be added.
7. Thumbnails ready.
8. Touch enabled for mobiles.

How To Add Featured Posts Swiper In Blogger Mobile Site?

Follow below steps to add featured posts swiper in blogger mobile site.

Step 1: Go to blogger dashboard and navigate to Template.

Step 2: Click on Edit Html.

how to edit html in blogger

Step 3: Search for <head> and just below it paste the following code.
<link href='https://rawgit.com/101Helper/mobile/master/swiper.css' rel='stylesheet'/>
<script src='https://rawgit.com/101Helper/mobile/master/swiper.js'/>

how to add javascript and css code in blogger

Step 4: Click on Save template.

Step 5: Go to Layout, click on add a gadget and open Html/Javascript.

Step 6: Copy code of desired swiper from below and paste it into Html/Javascript.

Mega Swiper Compatible With Desktop Site:

swiper featured post widget for blogger compatible with desktop site
<style>
.swiper-slide a {width: 100%;}
.swiper-container.swiper-container-horizontal {background: #eee;padding: 10px 0px;}
.swiper-container{width:100%;height:280px;margin:20px auto;}.swiper-slide{height: 270px;padding: 5px;text-align:center;font-size:18px;background:#fff;display:-webkit-box;display:-ms-flexbox;display:-webkit-flex;display:flex;}
.swiper-container.swiper-container-horizontal img {width: 100%;height:176px;margin: 0;right: 0.5px;position: relative;}
.swiper-container.swiper-container-horizontal h3 { position: absolute; left: 2px; top: 190px; font-size: 17px; width: 95%; padding: 5px; font-weight: normal; text-align: left; }
</style>
<div class="swiper-container swiper-container-horizontal" style="cursor: -webkit-grab;">
<div class="swiper-wrapper" style="transform: translate3d(-562px, 0px, 0px); transition-duration: 0ms;">
<div class="swiper-slide" style="margin-right: 30px;"><a href="YOUR POST LINK HERE"><img src="YOUR IMAGE LINK HERE"/><h3>YOUR POST TITLE</h3></a></div>
<div class="swiper-slide swiper-slide-prev" style="margin-right: 30px;"><a href="YOUR POST LINK HERE"><img src="YOUR IMAGE LINK HERE"/><h3>YOUR POST TITLE</h3></a></div>
<div class="swiper-slide swiper-slide-active" style="margin-right: 30px;"><a href="YOUR POST LINK HERE"><img src="YOUR IMAGE LINK HERE"/><h3>YOUR POST TITLE</h3></a></div>
<div class="swiper-slide swiper-slide-next" style="margin-right: 30px;"><a href="YOUR POST LINK HERE"><img src="YOUR IMAGE LINK HERE"/><h3>YOUR POST TITLE</h3></a></div>
<div class="swiper-slide" style="margin-right: 30px;"><a href="YOUR POST LINK HERE"><img src="YOUR IMAGE LINK HERE"/><h3>YOUR POST TITLE</h3></a></div>
</div>
</div>
<script src="https://rawgit.com/101Helper/mobile/master/installize.js"/>
    <!-- Initialize Swiper -->
    <!-- Swiper JS -->
    <script src="../dist/js/swiper.min.js"></script>
    <script>
    var swiper = new Swiper('.swiper-container', {
        pagination: '.swiper-pagination',
        slidesPerView: 1.5,
        centeredSlides: true,
        paginationClickable: true,
        spaceBetween: 30,
        grabCursor: true
    });
    </script>

Mega Swiper Non-Compatible With Desktop Site:

featured post widget for mobile minified version

Note: This swiper will show only in mobile not in desktop site.
<style>
@media only screen and (min-width: 800px) {
.swiper-container.swiper-container-horizontal{display:none;}}
.swiper-slide a {width: 100%;}
.swiper-container.swiper-container-horizontal {
background: #eee;
padding: 10px 0px;
}.swiper-container{width:100%;height:280px;margin:20px auto;}.swiper-slide{height: 270px;padding: 5px;text-align:center;font-size:18px;background:#fff;width:250px;display:-webkit-box;display:-ms-flexbox;display:-webkit-flex;display:flex;}
.swiper-container.swiper-container-horizontal img {width: 100%;height:160px;margin: 0;right: 0.5px;position: relative;}
.swiper-container.swiper-container-horizontal h3 { position: absolute; left: 2px; top: 190px; font-size: 17px; width: 95%; padding: 5px; font-weight: normal; text-align: left; }
</style>
<div class="swiper-container swiper-container-horizontal" style="cursor: -webkit-grab;">
<div class="swiper-wrapper" style="transform: translate3d(-562px, 0px, 0px); transition-duration: 0ms;">
<div class="swiper-slide" style="margin-right: 30px;"><a href="YOUR POST LINK HERE"><img src="YOUR IMAGE LINK HERE"/><h3>YOUR POST TITLE</h3></a></div>
<div class="swiper-slide swiper-slide-prev" style="margin-right: 30px;"><a href="YOUR POST LINK HERE"><img src="YOUR IMAGE LINK HERE"/><h3>YOUR POST TITLE</h3></a></div>
<div class="swiper-slide swiper-slide-active" style="margin-right: 30px;"><a href="YOUR POST LINK HERE"><img src="YOUR IMAGE LINK HERE"/><h3>YOUR POST TITLE</h3></a></div>
<div class="swiper-slide swiper-slide-next" style="margin-right: 30px;"><a href="YOUR POST LINK HERE"><img src="YOUR IMAGE LINK HERE"/><h3>YOUR POST TITLE</h3></a></div>
<div class="swiper-slide" style="margin-right: 30px;"><a href="YOUR POST LINK HERE"><img src="YOUR IMAGE LINK HERE"/><h3>YOUR POST TITLE</h3></a></div>
</div>
</div>
<script src="https://rawgit.com/101Helper/mobile/master/installize.js"/>
    <!-- Initialize Swiper -->
    <!-- Swiper JS -->
    <script src="../dist/js/swiper.min.js"></script>
    <script>
    var swiper = new Swiper('.swiper-container', {
        pagination: '.swiper-pagination',
        slidesPerView: 2,
        centeredSlides: true,
        paginationClickable: true,
        spaceBetween: 30,
        grabCursor: true
    });
    </script>

Mini Swiper Non-Compatible With Desktop Site - Dark Theme:

featured posts swiper for mobile site dark theme

Note: This swiper will show only in mobile not in desktop site.

<style>
@media only screen and (min-width: 800px) {
.swiper-container.swiper-container-horizontal{display:none;}}
.swiper-slide a {width: 100%;}
.swiper-slide a,.swiper-container.swiper-container-horizontal h3 {color: #fff;}
.swiper-container.swiper-container-horizontal {background: #222;padding: 10px 0px;}
.swiper-container{width:100%;height:200px;margin:20px auto;}.swiper-slide{height: 190px;padding: 5px;text-align:center;font-size:18px;width:250px;display:-webkit-box;display:-ms-flexbox;display:-webkit-flex;display:flex;}
.swiper-container.swiper-container-horizontal img { width: 100%; height: 130px; margin: 0; right: 0.5px; position: relative; }
.swiper-container.swiper-container-horizontal h3 { position: relative; font-size: 17px; width: 95%; padding: 5px; font-weight: normal; text-align: left; }
</style>
<div class="swiper-container swiper-container-horizontal" style="cursor: -webkit-grab;">
<div class="swiper-wrapper" style="transform: translate3d(-562px, 0px, 0px); transition-duration: 0ms;">
<div class="swiper-slide" style="margin-right: 30px;"><a href="YOUR POST LINK HERE"><img src="YOUR IMAGE LINK HERE"/><h3>YOUR POST TITLE</h3></a></div>
<div class="swiper-slide swiper-slide-prev" style="margin-right: 30px;"><a href="YOUR POST LINK HERE"><img src="YOUR IMAGE LINK HERE"/><h3>YOUR POST TITLE</h3></a></div>
<div class="swiper-slide swiper-slide-active" style="margin-right: 30px;"><a href="YOUR POST LINK HERE"><img src="YOUR IMAGE LINK HERE"/><h3>YOUR POST TITLE</h3></a></div>
<div class="swiper-slide swiper-slide-next" style="margin-right: 30px;"><a href="YOUR POST LINK HERE"><img src="YOUR IMAGE LINK HERE"/><h3>YOUR POST TITLE</h3></a></div>
<div class="swiper-slide" style="margin-right: 30px;"><a href="YOUR POST LINK HERE"><img src="YOUR IMAGE LINK HERE"/><h3>YOUR POST TITLE</h3></a></div>
</div>
</div>
<script src="https://rawgit.com/101Helper/mobile/master/installize.js"/>
    <!-- Initialize Swiper -->
    <!-- Swiper JS -->
    <script src="../dist/js/swiper.min.js"></script>
    <script>
    var swiper = new Swiper('.swiper-container', {
        pagination: '.swiper-pagination',
        slidesPerView: 2,
        centeredSlides: true,
        paginationClickable: true,
        spaceBetween: 30,
        grabCursor: true
    });
    </script>

Freestyle Only Text/Links Without Thumbnails Swiper:

featured posts swiper for mobile with text only blogger

<style>
.swiper-container.swiper-container-horizontal {background: #eee;padding: 10px 0px;}
.swiper-container{width:100%;height:200px;margin:20px auto;}
.swiper-container.swiper-container-horizontal img { width: 100%; height: 130px; margin: 0; right: 0.5px; position: relative; }
.swiper-slide {
    height: 190px;
    padding: 5px;
    text-align: center;
    font-size: 18px;
    display: -webkit-box;
    display: -ms-flexbox;
    display: -webkit-flex;
    display: flex;
    background: url(https://blogger.googleusercontent.com/img/b/R29vZ2xl/AVvXsEjtV39V4jr1ilCz-Bn71coKre_im_HH8Z8DtjeCydo4Ru0tZGIbQ7990jk-67DMOv-RR_EpOeAUg1Y8FSWAwjALcFnj90uik1bMhNd52xApvk0PPr5pBv9kKZl9l-rqKaqVflbIfgJRvaI/s1600/more.png) no-repeat #fff;
    background-position: 93% 94%;
}
.swiper-container.swiper-container-horizontal h3 {
    font-size: 15px;
    line-height: 1.2;
    text-align: left;
    position: relative;
    color: #2288bb;
    float: left;
}
.swiper-container.swiper-container-horizontal p {
    color: #666;
    font-size: 14px;
    padding: 0;
    text-align: left;
    margin: 0;
    float: left;
    padding-top: 5px;
    height: 93px;
    overflow: hidden;
}
@media only screen and (min-width: 800px) {
.swiper-container.swiper-container-horizontal{
display:none;
}
}
</style>
<div class="swiper-container swiper-container-horizontal" style="cursor: -webkit-grab;">
<div class="swiper-wrapper" style="transform: translate3d(-562px, 0px, 0px); transition-duration: 0ms;">
<div class="swiper-slide" style="margin-right: 30px;"><a href="YOUR POST LINK"><h3>YOUR POST TITLE</h3></a><p>YOUR POST TEXT(SMALL INTRO)</p></div>
<div class="swiper-slide swiper-slide-prev" style="margin-right: 30px;"><a href="YOUR POST LINK"><h3>YOUR POST TITLE</h3></a><p>YOUR POST TEXT(SMALL INTRO)</p></div>
<div class="swiper-slide swiper-slide-active" style="margin-right: 30px;"><a href="YOUR POST LINK"><h3>YOUR POST TITLE</h3></a><p>YOUR POST TEXT(SMALL INTRO)</p></div>
<div class="swiper-slide swiper-slide-next" style="margin-right: 30px;"><a href="YOUR POST LINK"><h3>YOUR POST TITLE</h3></a><p>YOUR POST TEXT(SMALL INTRO)</p></div>
<div class="swiper-slide" style="margin-right: 30px;"><a href="YOUR POST LINK"><h3>YOUR POST TITLE</h3></a><p>YOUR POST TEXT(SMALL INTRO)</p></div>
</div>
</div>
<script>
    var swiper = new Swiper('.swiper-container', {
        scrollbarHide: true,
        slidesPerView: '2',
autoplay: true,
speed: 2000,
        centeredSlides: true,
        spaceBetween: 30,
        grabCursor: true
    });
    </script>

Step 7: Click on save and note the ID of your gadget or give it a title so that you could find it easily for next steps.

Step 8: Go to template and find the swiper gadget which you just added by its ID or by its Title.

Step 9: After finding the swiper gadget in your template, you will see a line of code like this:

<b:widget id='HTML1' locked='false' title='Swiper' type='HTML' visible='true'>

You need to add mobile='yes' after locked='false' like this:

<b:widget id='HTML1' locked='false' mobile='yes' title='Swiper' type='HTML' visible='true'>

swiper in blogger mobile site

Step 10: Click on save and you are done, now you just need to enable mobile custom template for your blog and swiper will start showing up in your phone.

Step 11: Go to template and click on settings icon below mobile template.

how to change mobile template in blogger

Step 12: Choose Custom template for your mobile template and click on save button.

how to enable custom template for blogger mobile site

That's it! you are done.

I hope you like this post, if yes then share it with others. Thanks for visiting 101Helper.

NOTE: Never remove the Light blue highlighted area of the code!

How To Customize Mobile Swiper?

Handle the codes carefully incase of any removal of a single code can result in stopping of the swiper!

1. Replace YOUR IMAGE LINK HERE with your image links

2. Replace YOUR POST LINK HERE with your post links

3. Replace YOUR TITLE HERE with your post title.

4. Replace YOUR POST TEXT HERE with your post text.

5. To add more slides add below piece of code above the highlighted area(yellow).

For Only Text Swiper.

<div class="swiper-slide" style="margin-right: 30px;"><a href="YOUR POST LINK"><h3>YOUR POST TITLE</h3></a><p>YOUR POST TEXT(SMALL INTRO)</p></div>

For Image Swiper.

<div class="swiper-slide" style="margin-right: 30px;"><a href="YOUR POST LINK HERE"><img src="YOUR IMAGE LINK HERE"/><h3>YOUR POST TITLE</h3></a></div>

Search Tags: carousel slider for blogger mobile site, multiple posts slider for blogspot mobile site,touch slider for blogger,jquery,javascript,css touch slider for blogger mobile view,gadgets for blogger mobile site,101Helper blogging tutorials

Tuesday, July 12, 2016

How To Add "Join This Site" Button In Blogger

how to add join this site button in blogger


Members or "Join this Site" gadget has become common now adays in blogger because this gadget lets visitor to follow a blog. Anyone can start following a blogger blog by his blogger account. After following a blog the person's profile show up in members of blog. This gadget is very good for increasing traffic too because after following a blog, its feed show up in the followers account as shown in below image:


how to add join this gadget in blogspot

So when post is published it shows up in the blogger account and follower is updated about every post. So it is good for increasing traffic. But "Join this Site" gadget works only on http urls and as blogger has now allowed https for blogger therefore this gadget doesn't work on https urls but this button will still work no matter its a http url or https.

Instead of writing more about this gadget I am going to show you simply how to add join this site button in blogger. So follow below steps to add this button in your blog. If you want to try a live demo of this gadget click on JOIN THIS SITE on your right side.

One more thing that I want to tell you about this button is that when it is clicked you will be redirected to a page as shown below where you can Follow a blog with your blogger account.


How To Add "Join This Site" Button In Blogger?

Step 1: Choose a button and copy its code.

Top Right Floating Button:

<style>
Join button on top right of page
#join {
    z-index: 99;
    position: fixed;
    right: 20px;
    width: 150px;
    font-size: 16px;
    background: #fff;
    padding: 0px 5px;
    font-weight: bold;
    border: 1px solid #999;
    border-top: 0;
    border-radius: 4px;
    top: -5px;
}
#join img {
    float: left;
    top: 8px;
    margin-right: 5px;
    position: relative;
}
#join a {
color:#777;
text-decoration:none;
  }
</style>
<div id='join'><a href='https://www.blogger.com/follow-blog.g?blogID=YOUR BLOG ID'><img src='https://blogger.googleusercontent.com/img/b/R29vZ2xl/AVvXsEjqJyXpfCJvKffRVJJ45jWDphyKlSReD4WsUL3UD7DRBPJLoDssNcgg9wuRWMkUxD8n5EQr-Y3XPgfqmbr9ZyslTYRNx4BZ1KxddL-NITNiXa1EmhbSO9ZbDvhm_ZC56oPUzt6yAgue38I/s1600/join.png'/><p>Join This Site</p></a></div>

Top Left Floating Button:
<style>
#join {
Join button on top left of page
    z-index: 99;
    position: fixed;
    left: 20px;
    width: 150px;
    font-size: 16px;
    background: #fff;
    padding: 0px 5px;
    font-weight: bold;
    border: 1px solid #999;
    border-top: 0;
    border-radius: 4px;
    top: -5px;
}
#join img {
    float: left;
    top: 8px;
    margin-right: 5px;
    position: relative;
}
#join a {
color:#777;
text-decoration:none;
  }
</style>
<div id='join'><a href='https://www.blogger.com/follow-blog.g?blogID=YOUR BLOG ID'><img src='https://blogger.googleusercontent.com/img/b/R29vZ2xl/AVvXsEjqJyXpfCJvKffRVJJ45jWDphyKlSReD4WsUL3UD7DRBPJLoDssNcgg9wuRWMkUxD8n5EQr-Y3XPgfqmbr9ZyslTYRNx4BZ1KxddL-NITNiXa1EmhbSO9ZbDvhm_ZC56oPUzt6yAgue38I/s1600/join.png'/><p>Join This Site</p></a></div>

Bottom Right Floating Button:
<style>
#join {
    z-index: 99;
Join button on bottom right of page
    position: fixed;
    right: 20px;
    width: 150px;
    font-size: 16px;
    background: #fff;
    padding: 0px 5px;
    font-weight: bold;
    border: 1px solid #999;
    border-bottom: 0;
    border-radius: 4px;
    bottom: -5px;
}
#join img {
    float: left;
    top: 8px;
    margin-right: 5px;
    position: relative;
}
#join a {
color:#777;
text-decoration:none;
  }
</style>
<div id='join'><a href='https://www.blogger.com/follow-blog.g?blogID=YOUR BLOG ID'><img src='https://blogger.googleusercontent.com/img/b/R29vZ2xl/AVvXsEjqJyXpfCJvKffRVJJ45jWDphyKlSReD4WsUL3UD7DRBPJLoDssNcgg9wuRWMkUxD8n5EQr-Y3XPgfqmbr9ZyslTYRNx4BZ1KxddL-NITNiXa1EmhbSO9ZbDvhm_ZC56oPUzt6yAgue38I/s1600/join.png'/><p>Join This Site</p></a></div>

Bottom Left Floating Button:
<style>
#join {
Join button on bottom left of page
    z-index: 99;
    position: fixed;
    left: 20px;
    width: 150px;
    font-size: 16px;
    background: #fff;
    padding: 0px 5px;
    font-weight: bold;
    border: 1px solid #999;
    border-bottom: 0;
    border-radius: 4px;
    bottom: -5px;
}
#join img {
    float: left;
    top: 8px;
    margin-right: 5px;
    position: relative;
}
#join a {
color:#777;
text-decoration:none;
  }
</style>
<div id='join'><a href='https://www.blogger.com/follow-blog.g?blogID=YOUR BLOG ID'><img src='https://blogger.googleusercontent.com/img/b/R29vZ2xl/AVvXsEjqJyXpfCJvKffRVJJ45jWDphyKlSReD4WsUL3UD7DRBPJLoDssNcgg9wuRWMkUxD8n5EQr-Y3XPgfqmbr9ZyslTYRNx4BZ1KxddL-NITNiXa1EmhbSO9ZbDvhm_ZC56oPUzt6yAgue38I/s1600/join.png'/><p>Join This Site</p></a></div>

Pop-Up Join Button:
<script src='https://code.jquery.com/jquery-1.10.2.js'/>
<script>
$(function () {
join this site button for blogger pop up
Join this site pop up button
  $("#pop").fadeIn("slow", function () {
    $(this).delay(5000);
  });
});
$(document).ready(function(){
    $("#close-pop").click(function(){
        $("#pop").hide();
    });
});
</script>
<style>
#pop {
    display: none;
    position: fixed;
    left: 0;
    top: 0;
    background: rgba(0, 0, 0, 0.82);
    height: 100%;
    width: 100%;
    z-index: 99;
}
#join {
    padding: 10px;
    width: 500px;
    background: #fff;
    border-radius: 4px;
    height: 185px;
    position: absolute;
    top: 240px;
    left: 30%;
}
#join img {
    float: left;
    top: 8px;
    margin-right: 5px;
    position: relative;
}
#join a {
    text-decoration: none;
    background: #bd4e5d;
    padding: 5px;
    color: #fff;
    border-radius: 3px;
    position: absolute;
    top: 115px;
    left: 182px;
}
#join h2 {
    float: left;
    position: relative;
    top: 25px;
}
#join p {
    float: left;
    position: absolute;
    font-size: 15px;
    width: 300px;
    top: 55px;
    left: 180px;
}
#close-pop {
    float: right;
    font-size: 15px;
    cursor: pointer;
}
</style>
<div id='pop'><div id='join'><img src='https://blogger.googleusercontent.com/img/b/R29vZ2xl/AVvXsEgq2CuZu1f_cKGQWFmsA6GLn0OFEPjLQBPs0XwI1bqMNiQ4lIQ0fSnkk_W-j-NiggnN7-Lk6roK-qTOVFecGgxjcUyWzrgwrdPcDe1hPZJ1XxOeQacw9eMQ0XNAdh8U7yGELgdKi_k64Jo/s1600/join-icon.png'/><h2>Join This Site</h2><p>Join this site with your blogger account and never miss any post and updates.</p><a href='https://www.blogger.com/follow-blog.g?blogID=YOUR BLOG ID'>JOIN NOW!</a><b id="close-pop">✖</b></div></div>

Step 2: Go to your blog's template and click on Edit Html.

Step 3: Search for </head> and after this paste the copied code.

Step 4: Click on Save template and you are done!

Customization:

1. Replace "YOUR BLOG ID" with your blog's unique id.
2. In Pop-Up button set delay after which button will fade in, default value is 5000 with mean 5 seconds.

I hope you found this post helpful,  the main thing which I want to share in this post is the HTML code below:

<div id='join'><a href='https://www.blogger.com/follow-blog.g?blogID=YOUR BLOG ID'><img src='https://blogger.googleusercontent.com/img/b/R29vZ2xl/AVvXsEjqJyXpfCJvKffRVJJ45jWDphyKlSReD4WsUL3UD7DRBPJLoDssNcgg9wuRWMkUxD8n5EQr-Y3XPgfqmbr9ZyslTYRNx4BZ1KxddL-NITNiXa1EmhbSO9ZbDvhm_ZC56oPUzt6yAgue38I/s1600/join.png'/><p>Join This Site</p></a></div>

The link in this code takes you to blog follow page which is the main thing, though you can add Join This Site Gadget in your blog but it don't work on https urls. But the benefit of this link is, you can visit it on http as well as https.

If you have any question or suggestions comment below or contact us.

Thanks for visiting 101Helper

Search Tags: Join this site gadget for blogspot,members gadget for blogger,add a join this button in blogger blog,blogger followers gadget,how to add join this blog gadget in blogget

Monday, July 4, 2016

How To Add Twitter Cards In Blogger

twitter cards in blogger blogspot blogs tutorial 101helper

You might be thinking, why I am posting about Twitter again because I have recently created a post about Twitter follow box and before that I have also created some posts about twitter like Twitter animated bird gadget and some other posts. But the reason which made me to write another post related to twitter is something new and interesting that is "Twitter Cards".

You might have heard about it. If you know about Twitter Cards then you are good at Twitter marketing and you must be getting good traffic from twitter.

So this post is about Twitter cards, How to add Twitter cards in blogger, what is its significance, What are types of twitter cards and everything about Twitter cards.
So let me start from:

What A Twitter Card Is?

Twitter cards are a kind of optimizations which makes your tweets more living. With twitter cards you are able to add images, videos and media experiences in your tweets. You just need to add some Html code in your template and after that when someone tweets your post, the tweet will carry post image or video so making your tweets more living.

Significance Of Using Twitter Cards:

Twitter cards have following significance:

1. Twitter cards add images, videos, GIF's and other media to your tweets.
2. Twitter cards make your tweets more attractive.
3. Boost your twitter engagement, people view your tweets and visit your links.
4. Ultimately you get more traffic from twitter.
5. Unique tweets with twitter cards bring you more followers too!
6. After embedding tweets tweeted with twitter cards they have an amazing look so you will definitely get noticed by your visitors so you will get more and more followers.

Types Of Twitter Cards:

1. Summery Card: Summery card contains title, description, thumbnail and twitter account info. All the info is gathered from the post it is tweeted. Take a look of summery card below.

twitter summery card in blogger

2. Summery Card With Large Image: It is same as summery card with a little difference of large image unlike small image a in summery card. The large image is so prominent that such tweet will definitely get response of users. I have a demo of it too, take a look below.

summery twitter card with large image blogger


3. App Card: An app card contains info about your site's mobile app with a Download button which directly takes you to App store. So this card is good for those who have apps for their site. This card has different looks for mobile and desktop, you can take a look below.

twitter mobile android,ios app card blogger

4. Player Card: A card which provides tweets with videos, audio, images, GIF's and other media. This card is best for sites with media content like videos or audio(mp3). You can take a look below.

player card twitter blogger tutorial

How To Add Twitter Cards In Blogger?

1. Summery Card:

To install twitter summery card in your blog include the code given below in your template after <head>
<b:if cond='data:blog.pageType == &quot;item&quot;'>
<meta content='summary' name='twitter:card'/>
<meta content='@101helperblog' name='twitter:site'/>
<meta expr:content='data:blog.pageName' name='twitter:title'/>
<meta expr:content='data:blog.metaDescription' name='twitter:description'/>
<meta expr:content='data:post.firstImageUrl' name='twitter:image'/>

Replace @101helperblog with your blog's twitter ID. You can check if your card is working fine or no by either tweeting your post or by using Twitter Card Validator.

2. Summery Card With Large Image:

Copy the below code and paste it in your template after <head> and save your template.
<b:if cond='data:blog.pageType == &quot;item&quot;'>
<meta name="twitter:card" content="summary_large_image"/>
<meta name="twitter:site" content="@101helperblog"/>
<meta name="twitter:creator" content="@101helperblog"/>
<meta name="twitter:title" expr:content='data:blog.pageName'/>
<meta name="twitter:description" expr:content='data:blog.metaDescription'/>
<meta name="twitter:image" expr:content='data:post.firstImageUrl'/>
</b:if>

Replace @101helperblog with your's(twitter:creator) and your blog's(twitter:site) twitter ID.

3. App Card:

This card is not for everyone because I don't think that bloggers have ios app. But maybe those who buy a domain later after successful blogging, the may create ios app. So this card is for those who have ios app and they want to increase their downloads. Simple include the below code in your template just after <head>.
<meta name="twitter:card" content="app"/>
<meta name="twitter:site" content="@TwitterDev"/>
<meta name="twitter:description" content="Cannonball is the fun way to create and share stories and poems on your phone. Start with a beautiful image from the gallery, then choose words to complete the story and share it with friends."/>
<meta name="twitter:app:country" content="US"/>
<meta name="twitter:app:name:iphone" content="Cannonball"/>
<meta name="twitter:app:id:iphone" content="929750075"/>
<meta name="twitter:app:url:iphone" content="cannonball://poem/5149e249222f9e600a7540ef"/>
<meta name="twitter:app:name:ipad" content="Cannonball"/>
<meta name="twitter:app:id:ipad" content="929750075"/>
<meta name="twitter:app:url:ipad" content="cannonball://poem/5149e249222f9e600a7540ef"/>
<meta name="twitter:app:name:googleplay" content="Cannonball"/>
<meta name="twitter:app:id:googleplay" content="io.fabric.samples.cannonball"/>
<meta name="twitter:app:url:googleplay" content="http://cannonball.fabric.io/poem/5149e249222f9e600a7540ef"/>

After adding this code in your site or blog below <head> make following changes.
1. <meta name="twitter:card" content="app"/>
2. <meta name="twitter:site" content="YOUR SITE'S TWITTER ID"/>
3. <meta name="twitter:description" content="SITE DESCRIPTON"/>
4. <meta name="twitter:app:country" content="APP COUNTRY"/>
5. <meta name="twitter:app:name:iphone" content="YOUR APP'S IPHONE NAME"/>
6. <meta name="twitter:app:id:iphone" content="YOUR APP ID FOR IPHONE"/>
7. <meta name="twitter:app:url:iphone" content="YOUR APP'S IPHONE URL E.G: cannonball://poem/5149e249222f9e600a7540ef"/>
8. <meta name="twitter:app:name:ipad" content="YOUR APP'S IPHONE NAME"/>
9. <meta name="twitter:app:id:ipad" content="YOUR APP ID FOR IPAD"/>
10. <meta name="twitter:app:url:ipad" content="YOUR APP'S IPAD URL E.G: cannonball://poem/5149e249222f9e600a7540ef"/>
11. <meta name="twitter:app:name:googleplay" content="YOUR APP'S GOOGLEPLAY NAME"/>
12. <meta name="twitter:app:id:googleplay" content="YOUR APP'S GOOGLEPLAY ID E.G: io.fabric.samples.cannonball"/>
13. <meta name="twitter:app:url:googleplay" content="YOUR APP'S GOOGLEPLAY URL E.G: http://cannonball.fabric.io/poem/5149e249222f9e600a7540ef"/>

4. Player Card:

Player card is for those sites which have videos or audio content. If you have a blogger having video content then you can install this card in your blog. Just copy the below code and paste it in each of your post's Html editor not in text editor or in template. After pasting the code below just make changes according to your needs. If you have videos hosted on youtube then you don't need this card because Youtube has installed the cards, you don't need to install player card.
<meta content='text/html; charset=UTF-8' http-equiv='Content-Type'/>
<meta name="twitter:card" content="player"/>
<meta name="twitter:site" content="@TWITTER ID"/>
<meta name="twitter:title" content="TITLE OF VIDEO"/>
<meta name="twitter:description" content="DESCRIPTION OF VIDEO"/>
<meta name="twitter:image" content="IMAGE URL FOR VIDEO"/>
<meta name="twitter:player" content="PAGE URL CONTAINING VIDEO"/>
<meta name="twitter:player:width" content="480"/>
<meta name="twitter:player:height" content="480"/>
<meta name="twitter:player:stream" content="URL OF VIDEO E.G: Yourvideo.com/video.mp4"/>
<meta name="twitter:player:stream:content_type" content="video/mp4"/>
<meta name="twitter:player:stream" content="http://devimages.apple.com/iphone/samples/bipbop/gear1/prog_index.m3u8"/>
 <meta name="twitter:player:stream:content_type" content="video/mp4;codecs=&quot;avc1.42E01E1, mp4a.40.2"/>

One more thing about this card that after implantation of code you need to request Twitter for approval. So go to Twitter Card Validator to first confirm that your card is implanted correctly or no and after that you have to send request for approval.

After validating your player card you will see following page, click on Request Approval.

how to request twitter for player card approval

Fill up the form and send request and wait for approval!

how to request twitter for player card approval 101helper

NOTE: Include the above code only once in a page for a video. Also use https for every link you add inside meta tags. Otherwise you won't get your player card approved!

I hope you found this post helpful. I have used all the meta tags in my template to check if they are working fine or no and I found every tag working fine. But if you have any problem ask me or if you have any info about Twitter Cards share it with me so that I can add it in this post.

Thank you very much for visiting 101Helper, do visit again. Share us with your fiends and co-bloggers or webmasters. Follow us on social networks to stay updated.

Search Tags: twitter cards in blogger,twitter app,player,summery cards in blogger or website,info about twitter meta tags,optimize blogger blog for twitter,get traffic from twiiter,twitter cards blogspot