Friday, September 25, 2015

How To Choose Right Keywords To Boost Your Traffic - Blogger Seo

How To Choose Right Keywords To Boost Your Traffic - Blogger Seo

What are keywords and how do they help you to get visitors to your site? if this question is in your mind then you have reached to right place. Here you will learn everything about keywords and there importance. Keywords are the words used by visitors to search something in search engines and if you have that keyword in your blog then search engines will show your site and hence you will get maximum visitors to your blog. Keywords is an important part of on-page seo. Mainly keywords are of two types:

(1). Short Keywords:


Short keywords are those which contains only one or two words. For example for my blog Blogger Widgets, Blogger Seo, Blogger Menus are the short keywords. These keywords should be most relevant to your content otherwise they are useless. Also these keywords should be used in the main template in the <head> section. It has become so common that it is almost in every blog in the meta tag form. Like this:

<meta content="Most Relevant Keywords" name="keywords"/>

Short keywords should be searched very accurately because they play a vital role in seo so best tools should be used to find them or else you will loss all of your traffic. You can use Google Keywords Planner to search most relevant keywords for your blog. It is the best tool to find keywords.

You can also find best short keywords for your blog using Google search if you know the category of your blog for example if you have a blog about fashion then you can use to search the "latest fashion" to get more related words and you can use them as your short keywords. Now when someone will search fashion or any other related word your blog will appear in search results. You can see an example in below image:

keywords-for-blogger-seo

You can see related keywords in the above image. Now all you have to do is to add these keywords in your blog.

Moreover if you get other keywords from search engines using which people reach your blog collect them and use them as your keywords too. To find keywords used by visitors go to Stats > Traffic Sources and choose month or week or all time to see keywords used by visitors to reach your blog.

how-to-find-best-keywords-for-seo

(2). Long tail keywords:


These are the keywords which are most important for seo. A long tail keyword is actually a sentence used to search something and it is used more than short keywords. Short keywords are used to search the most popular sites like Facebook, Google, blogger, reddit etc so they are not important than long tail keywords for bloggers and other articles publishing sites like Moz or Wikihow. So a blogger should focus on long tail keywords more than short keywords.

If you are a seo researcher then you must know what are long tail keywords and how do they help visitors to reach to what they are looking for.


Long tail keyword is of 3-4 words or sometimes a full sentence. For example if you want to search for optimizing your blog for seo, then what would you Google? I guess "how to optimize blogger blog for seo Or How to get your site to the top of search results Or how to boost blog traffic" etc. These are the long tail keywords and similar to you everyone would search something similar to it or search for what Google show in the list. So you can use these long tail keywords to boost your traffic.

Where should be long tail keywords used? as short keywords have taken the space in the template
in the meta tag. Don't worry you can use long tail keywords in the search description of your post. Separate them by comma. And don't type the description just add long tail keywords as your description.

You can see a live demo to make sure if long tail keywords really work or no by googling "featured posts widget blogger" you will see 101Helper in the search results.

keywords-for-seo-boost-traffic

You can collect long tail keywords from Google Keyword Planner but I recommend you to collect them manually or use online long tail keywords generator to search keywords for every post you write. It will boost your traffic in a very short time.

I hope you found this post helpful if you have an problem ask me in comments below. Follow and subscribe to get latest updates about blogger seo.

Please share this post with others and keep visiting 101Helper.

Search Tags: High desity keywords,Keywords search, On-page seo blogger,Keywords planner,How to get deep keywords to boost blog traffic,Get organic traffic from search engines.

Tuesday, September 22, 2015

Jquery Slide Down Mobile Menu For Blogger

jquery-stylish-slide-down-menu-for-mobile-blogger.gif

A successful blogger is that who knows the importance of a mobile site. As blogger has no gadgets for mobile site therefore you have to add them manually. Basic things which are important for a mobile site are a search box, a related posts widget and a menu. If your mobile site has these gadget then your site is ready for mobiles.

In blogger page list is commonly used as a menu as it becomes a selector in mobile site. But it doesn't look professional and most of the visitors don't like it. So today I have a stylish jquery slide down menu for your blog's mobile site. It works on jquery so it works properly in all mobiles either it is iphone or Microsoft mobile or something else. But if you are using a phone which doesn't support javascript or jquery then this menu won't work on it.

In this post I will share my first mobile menu for blogger and show you how to add it in your blog's mobile site. So follow below mentioned steps to add this menu in your blog you can see a live demo of this menu above.

How To Add Stylish Jquery Menu In Blogger Mobile Site?

Step 1: Go to blogger dashboard > layout and click on "add a gadget" below header.


Step 2: Give a title to your gadget e.g mobile menu. Because it will help you in finding this gadget in your template in coming up steps.

Step 3: Find Html/Javascript and click on it.

how-to-add-html-javascript-in-blogger

Step 4: Copy below code and paste it into Html/Javascript window.

Tip: Click inside the code container and use Ctrl+A to select code and Ctrl+C to copy it!


how-to-add-mobile-menu-in-blogger

Step 5: Click on save, go to template and click on Edit Html.

how-to-edit-html-in-blogger

Step 6: Click inside the code and search for the name which you have given to your menu in step 2. I am searching for Mobile Menu as I've given it to my gadget.

You can also use jump this gadget to jump to your widget but its possible only if you have ID of your widget.

You Might Also Like Reading: How To Find ID Of A Gadget In Blogger

how-to-add-mobile-menu-in-blogger-101helper

Step 7: Type mobile='only' beside locked='false' and click on save template.

how-to-show-a-gadget-in-blogger-mobile-site-view

Thats it! you are done. Now open your blog in your phone and try your menu.


How To Edit This Menu?

You can't edit this gadget as you do others because after adding mobile='only' you have commanded blogger to show this gadget in your blog's mobile view only so if you check your layout now you will not see any gadget below header as it is shifted to mobile site. So to edit this menu and add your custom tabs in it follow below steps.

Step 1: Login to your blogger account first and then go to your blog's mobile site using below link:

https://yourblog.blogspot.com/?m=1

Step 2: Now find the edit image(wrench and screw driver) below your menu as shown in below image:


Step 3: Click on it and Html/Javascript window will be opened, now you can make changes in your gadget. Click on save after making changes and you are done.

Customization:

You can change its color font, font-size and every thing if you know CSS but I recommend you to use it as it is. Do only slight changes like font color or font family.

The important thing which needs customization is adding new tabs and links or removing existing tabs. So read below to add or remove any tab.

To Add A New Tab:

You can add a new tab using below piece of code:

<li><a href="Your tab's link">Your Tab's Text Or Name</a></li>

Replace Your tab's link with your link and Your Tab's Text Or Name with your tab name. For example:

<li><a href="https://101helper.blogspot.com/">Home</a></li>

To Remove A Tab:

Remove its code from <li> to </li> for example to remove Home button I will remove:

<li><a href="https://101helper.blogspot.com/">Home</a></li>

Important Note: Add or remove a tab between <ul> id="nav" style="display: none;"> and </ul> in the given code.

Menu Not Appearing?

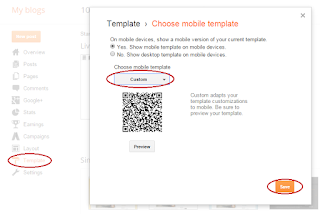
You might face a common problem of gadget not appearing in mobile view so for that you have to use custom mobile template. If you haven't switched to custom mobile template yet then go to blogger dashboard template and below the mobile template click on the edit icon. Now switch to custom template as shown in below image;


I hope you like this post and this menu is working properly in your blog if not please ask me by leaving a comment below. Share this post with others. Follow and subscribe for more blogger gadgets, menus, tutorials etc. Thanks for visiting 101Helper.

Search Tags: Mobile Menu For Blogger,Jquery menu for mobile site,Blogger mobile view gadgets,Blogger slide down menu for mobile site,101helper menus for blogger blogs,iphone mobile menu.

Thursday, September 17, 2015

How To Submit Blogger Sitemap To Bing Webmaster Tools

How-To-Submit-Blogger-Sitemap-To-Bing-Webmaster-Tools-101helper

I am sure Bing doesn't need to be introduced. Everybody knows Bing. It is the second most used search engine after Google which makes it important for bloggers and webmasters who are trying to promote their newly created site. One of the most important step to promote a blog or site is to submit its sitemap to every search engine so that it can be indexed and people can reach it though search engines. And that's why I created this post to help newbies how to submit blogger blog's sitemap to Bing Webmaster Tools. It will help Bing to crawl your blog and index every post you create. So follow below steps to submit your blog's sitemap to Bing. If you have any questions you can ask me in comments below.

You Might Also Like Reading:
  1. How To Add Your Blog To Google Webmaster Tools
  2. How To Submit Blogger Sitemap To Yandex
  3. Submitting Sitemap To Google Webmaster Tools
  4. How To Setup Google Custom Search Box In Two Pages In Blogger
  5. How To Fix Blogid,Postid,Image_url,Updated Errors In Blogger
Requirements:
How To Submit Sitemap To Bing In Blogger?

Step 1: Go to Bing Webmaster Tools and sign-in using your Microsoft account.

Step 2: Click on Add a Site in the menu above Dashboard.


how-to-submit-blogger-sitemap-to-Bing-webmaster-tools

Step 3: Enter your blog's Homepage link and below it enter your blog's sitemap link. Leave the third option as it is.

I recommend you to use https://www.yourblog.blogspot.com/sitemap.xml as your sitemap url.

how-to-submit-blogger-sitemap-to-Bing

Congratulations! you are done successfully now its time to verify your ownership so follow below steps.


How To Verify Ownership In Bing Webmaster Tools?

Step 1: Click on Configure My Site below Dashboard in the menu and click on Verify Ownership.

how-to-verify-ownership-in-bing

Step 2: On the verification page there are three ways to verify your bing webmaster tools but we will choose the second option which is meta tag verification. So copy the meta tag of your webmaster tools as shown in below image.

how-to-verify-ownership-in-bing-webmaster-tools

Step 3: Now go to Blogger Dashboard > Template and click on Edit Html.


Step 4: Click inside the code and search for <head> by using Ctrl+F on your keyboard.

verify-bing-ownership-blogger-tutorial

Step 5: Paste the Bing meta tag below <head> as shown in above image.

Step 6: Click on save template and go back to Bing verification page.

Step 7: Click on Verify button in the bottom and you are done.

Congartulations! Now your blog is verified in Bing Webmaster Tools. Bing will process your sitemap as soon as possible and index all your pages.

bing-webmaster-tools-tutorials-blogger

Important Note: Never remove Bing meta tag from your blog template even after verification because if you do so Bing will not index any of your page and start removing the already indexed pages.

After submitting your site to Bing Webmaster Tools wait for bing to index your pages meanwhile you may make some changes in your Robots text to indicate Bing which pages are to be indexed and which not.

Check Out: How To Use Robots Text For Better Seo

I hope you liked this post. If yes please share your views by leaving a comment below and share this post with others. Follow and subscribe to newsletter for latest updates about webmaster tools tutorials or blogging.

Search Tags: How to submit sitemap to webmaster tools, bing webmaster tools, blogger sitemap, blogger tutorials webmaster tools, 101Helper webmaster tools tutorials for blogger, How To Submit Blogger Sitemap To Bing Webmaster Tools,boost traffic,seo.

Tuesday, September 15, 2015

How To Make Gadget Sticky/Float In Blogger

Make-a-gadget-sticky-in-blogger-101helper

Making a gadget sticky or floating means to make it fixed in a position when page is scrolled down and it is possible with javascript. Gadgets are made sticky to provide visitors a good user experience such as a menu which floats with user so now he doesn't need to scroll up again and again to navigate through your blog. Similarly more gadgets are also made sticky such as ads or email subscription widget to get more clicks on ads and to get more subscribers respectively. You can see a live demo of making a gadget sticky on right side of this page(Recommended Articles). I have made it sticky to help visitors reach all of my content. Similarly you can also do it by following this post. So if you want to make any of your widget sticky then follow below steps.

 Don't Miss: 
How To Make A Gadget Sticky Or Float In Blogger:

Step 1: Go to blogger dashboard and navigate to layout.

Step 2: Add a gadget or edit an existing gadget which you want to make sticky.

Step 3: Copy its ID as shown in below image:

how-to-get-id-of-a-gadget-in-blogger


Step 4: Go to template and search for </body> by using Ctrl+F.

Step 5: Copy below code and paste it just above </body>.
<style>.sticker {background:#F5F5F5;position:fixed; top:0px; z-index:99;}</style>
<script>
//<![CDATA[
bs_makeSticky("HTML6"); 
function bs_makeSticky(elem) {
    var sticky = document.getElementById(elem);
    var scrollee = document.createElement("div");
    sticky.parentNode.insertBefore(scrollee, sticky);
    var width = sticky.offsetWidth;
    var iniClass = sticky.className + ' sticky';
    window.addEventListener('scroll', sticker, false);
    function sticker() {
        var rect = scrollee.getBoundingClientRect();
        if (rect.top < 0) {
            sticky.className = iniClass + ' sticker';
            sticky.style.width = width + "px";
        } else {
            sticky.className = iniClass;
        }
    }
}
//]]>
</script>

how-to-make-gadgets-sticky-float-in-blogger

Step 6: Replace HTML6 with your gadget's ID which you found in step 3.

Step 7: Click on save template and you are done. 

Customization:

(1). To change background color or your floating widget replace #F5F5F5 with desired color code.

You Might Also Like: How To Get Code Of A Color, Color Code Generator.

(2). To Change the height of your floating widget(height from top) make changes in top:0px;

I hope you like this post and it was helpful to you. Follow and subscribe to our newsletter or stay in touch with us via social networks to get latest updates about blogger tricks. Thanks for visiting 101helper.blogspot.com. Share this post with others and help me spread my blog.

Search Tags: Sticky gadget blogger, jquery tricks blogger, make a div float, javascript tricks blogger, 101helper blogging tricks, make a widget floating or sticky in blogger.

Saturday, September 12, 2015

How To Earn Money With Chitika In Blogger

how-to-earn-money-blogging

Chitika is one of the highest paying ad network and very suitable for blogger blogs. It has good ppc rates and tracks traffic very accurately. It is very easy to use chitika for blogger because of its easier integrating service. It has all types of ad units e.g text ads, slide out ad, hover ads(appear when text is selected) and banners of every size. Chitika has started referral program also so now you can double your earnings by referring others to Chitika. Chitika payout method is paypal. In this tutorial I will show you how to earn money with chitika in blogger.

Requirements:
  1. A blog - Create a blog if you don't have one.
  2. Chitika account.
  3. Paypal account - To payout.

How To Sign-Up For Chitika?

Step 1: Go to Chitika.

Step 2: Enter your Email address and click on GO!

how-to-sign-up-chitika

Step 3: Open your Email and open the recent mail by Chitika.

Step 4: Click on Complete My Application.

how-to-apply-chitika-blogger

Step 5: Fill out the form. Enter your name, username, website url, password and select your country.

how-to-set-up-chitika-account-blogger

Step 6: Click on submit and wait for approval.


After approval you have to add ads in your blog to start earning money. So after approval follow below steps to add ads in your blog.

How To Add Chitika Ads In blogger?

Step 1: Go to Chitika and log in to your account using your email and password.

Step 2: Click on Ads and press Get code.

how-to-add-chitika-ads-in-blogger

Step 3: Scroll down to "Ad Code Generator" and select your ad using selector, you can see a preview of your ad below selector.

how-to-add-chitika-ads-in-blogger-101helper

You can customize your ad by clicking on Customize button

Step 4: Click on Get Code and copy the code.


Step 5: Go to blogger dashboard and click on layout.

Step 6: Click on Add a gadget and scroll down to Html/Javascript.

Step 7: Click on Html/Javascript and paste the code of ad.

Step 8: Click on Save and you are done.


How To Boost Your Chitika Earnings?

To boost your earnings you have to:
  1. Boost your traffic using seo .
  2. Attract visitors to your blog.
  3. Implement ads in right places to get maximum clicks on your ads.
  4. Refer other to chitika using refer banners provided by chitika.
I hope you like this post and it was helpful to you. Follow and subscribe for more blogger tutorials. Share this post with others and help me spread my blog. Thanks for visiting 101Helper.

Search Tags: Chitika Review, How to earn money with chitika, How to boost earnings, How to get more clicks on ads,Earn money blogging,Refer and earn,earn money online,101helper blogger tutorials.

Sunday, September 6, 2015

Related Posts Slide Out Gadget For Blogger


"Slide out related posts gadget" is a gadget powered by addthis which works on jquery. It is one of the most important gadget that is very beneficial for those who have a very low traffic. This gadget slides up when a page is scrolled down and on every page it shows a different recommendation so every post is shown one by one which boosts your traffic stats. One more special thing about this gadget is that it doesn't affect your blogs speed. Moreover you can see analytics of  your slide out gadget which shows you "how many click you have got" on your recommendations. So you have a full information about your traffic stats. This gadget is available for both mobile sites and desktop sites. So now you can add this gadget in your mobile site as well as desktop site and start boosting your traffic.

In this post I will show you how to install slide out related posts widget  in blogger. Let us start adding it desktop first.

How To Add Related Posts Slide Out Gadget In Blogger Desktop Site?

This gadget is very easy to install. You can do it in just a few minutes. All you need is anAddthis account. So first signup for an Addthis account and after that follow below steps.

Step 1: Sign up for an Addthis account and sign in to your account.

Step 2: Click on TOOLS.

slide-out-related-posts-widget-blogger-101helper

Step 3: Scroll down to Recommended Content section and click on What's Next on the right side.

related-posts-slide-out-gadget-blogger-mobile

Step 4: Give a title to your slide out gadget that will appear above the post name and select theme of your slide out gadget.


<------------ Optional Part Of Post-------------->

Your gadget is almost ready but if you want you can make some customizations like:

(1). Hiding this gadget on specific pages of your blog.
(2). Position of gadget(left or right).
(3). Responsive width(width after which the gadget should slide up when page is scrolled).

So to make such customizations click on "Show more options"


To hide the slide out on Homepage select No option below it. And if you want to hide this slide out in certain pages then move to Hide On These Pages and add the links of these pages between * if you want to hide it on multiple pages then separate the links by come(,).

Below it there is an option to promote a specific page into the first slot but you can use this feature only if you have Pro(Premium) account.


latest-blogger-gadgets-101helper.blogspot

The next option is Responsive Width which is the width in pixels after which the gadget would slide up when a user scrolls down your page. Set the desired width by typing it.

And the last option is Offset which decides whether the related post slide out will be shown on right side or left side. Choose the desired option, you can see a preview of your gadget above.

slide-out-related-posts-widget-blogger-free

<------------ Optional Part Of Post Ends-------------->


Step 5: Copy the code and click on Activate.

slide-out-related-posts-widget-blogger-free

Congratulations! your gadget is activated now you have to install it in your blog.

Step 6: Go to blogger dashboard, navigate to template and click on Edit Html.

Edit-html-blogger

Step 7: Click inside your code and search for <head> by using Ctrl+F.

Step 8: Just below it paste the copied code.

how-to-use-blogger-template

Step 9: Click on save template and you are done.

How To Add Related Posts Slide Out Gadget In Blogger Mobile Site?


Step 1: Login to your Addthis account and navigate to tools as show above.

Step 2: Scroll to the end of the page and find What's Next Mobile.

slide-out-related-posts-widget-blogger-mobile

Step 3: Click on Setup and choose the desired options for your gadget e.g theme, title etc as shown above.

Must Read: Click on activate and you are done. If you have already added this gadget in your desktop them you don't have to follow next steps because you have already added the Addthis code to your blog. But if you haven't added Addthis code in your blog them follow next step!

Step 4: Copy the code and go to blogger > template and click on Edit Html.

How-to-edit-html-in-blogger

Step 5: Click inside the code and search for <head> by using Ctrl+F.

how-to-use-blogger-template

Step 6: Just below it paste the copied code and save your template as shown in above image.

If the gadget fails to appear in your blog's mobile site then go to template and switch your blog's mobile template from simple to custom.

how-to-create-mobile-site-blogger

If the widget still fails to appear in your mobile then optimize your blog's mobile site for phones or hire us to optimize it for you.

I hope this gadget was helpful to you and it didn't waste your time. Please share it with others and subscribe for latest blogger tutorial news. Share your views about this post in comments below. Thanks for visiting 101Helper.

Search Tags: Slide out related posts gadget for blogger, blogger mobile site gadgets, 101helper blogger tutorials, Related Posts Slide Out gadget For Blogger,New blogger widgets,Addthis tutorials for  blogger.

Thursday, September 3, 2015

Why A Website And Mobile Site Is Important?

                                                                             
It sounds so interesting when you think of having your own website. And If you think and wish to have a website then you can create your own just in a few minutes. Creating a website has become so easy now a days that everyone can create a website because these days are gone when websites were owned by only those who had programming skills. Now the time has come that everyone is capable of creating his own site using online site builders. Websites are mainly of two types e.g personal and business websites. Most of the sites are created for businesses or to earn money online.


Why Do I Need A Personal Website?
business-personal-website-design

Personal websites are those websites which a individual creates so you can use your website for any purpose. Most of the personal websites are created for following purposes.
  • To educate people.
  • To teach people some personal skills e.g cooking, magic, martial arts etc.
  • To earn money from home.
  • To promote personal skills like music albums.
There are several other reasons for creating a personal website. A personal website could be used for any purpose but most of the personal websites are created either to earn money online or to promote personal skills like music albums, newly formed band, paintings etc.

Why Do I Need A Business Website?

business-website-designYou might be surprised when you come to know that there are many small businesses which don't have websites which is not good for a business because creating a business website is like opening your door and inviting your customers. So if you own a business you can create a website to increase your sales as well as promote it through internet. Major benefits of a business website are mentioned
below:
  • It is the best way to promote your business through internet all over the world.
  • If you own a shopping business you can allow your customers to buy and pay online.
  • Business website is good for reputation of your business also.
  • People can know and reach your business though your website.
After creation of website another things come which also needs attention. Like promoting your site, making it ready for all devices e.g mobiles phones, tablets, PC etc. 

A website can be promoted thought advertising or by seo(search engine optimization).

Read more about importance of having a website for business at dogulindigital(A well known business analyst site).

Mobile Ready Websites:

mobile-ready-sites
If you are a webmaster or you have a little concern with internet then you must know the importance of a mobile ready sites. Especially now a days its very important to have a website ready for mobiles because mobile phones are used more the computers for all purposes e.g shopping, gamming, office work, social interaction etc. So if you own a website whether it is business or personal you need a mobile site too and these days it's very easy to create a mobile site.

Its not easy to create a mobile site for blogger but if you are using an online website builder then its very easy because you don't have to do any thing. You just have to grab and drop items and your mobile site is ready.

Some benefits of having a mobile ready website are mentioned below:
  • The most important reason for having a mobile ready site is search engines like websites which are mobile friendly.
  • If you own a website for business then it will increase your customers because mobile phone is rarely used.
  • Mobile ready websites look professional also, so you have a good impression if you have a mobile friendly site.
It doesn't ends with the above benefits. These are the major benefits of having a mobile friendly site, there are many other small benefits which you can read at MOZ.

Final words:

This article ends here with mobile friendly site's benefits, it is an ultimate guide about having a website, its benefits and why so you build a site. In the end of the post I would like to tell you about some best website builder so click here to read about them. I would be glad to know your views about this post. Hope you like this post, share it with others are help me spread my blog.