Sunday, December 27, 2015

How To Verify Your Site/Blogger Blog With Alexa

how to verify a site with alexa

Alexa is a site which keeps data of sites and blogs and give them a rank in that site's region and a Global rank which depends on its traffic, traffic sources, keywords used to reach that site etc in other words Alexa is rich of sites history. It tells people about how famous a site is that's why webmasters try to increase their site traffic and improve their Alexa rank to show people how popular their site is and it improves a site's impression too. But most of people who are not too friendly with site development and internet get confuse with how Alexa works which is very easy to understand. Alexa gets info from search engines and site analytics and show a rank on traffic and search analytics basis.

One more thing is webmasters want to show a desired country on Alexa rank page and don't know how to do that. Only a few know that it could be done by verifying a site with alexa. So in this post I will tell you how to verify your site with alexa. After verifying your site with Alexa you will get following things!
  • More accurate and clear analytics of your site e.g search keywords, traffic sources, daily time on page etc.
  • You can specify a site to be shown on rank page.
  • You can add info about your site e.g contact info, logo etc.

Follow: +101Helper On Google To Stay Up To Date!

How To Verify A Site With Alexa?

Follow below steps to get your site verified with Alexa!

Step 1: Create an Alexa account.

Step 2: Sign in to your account.

Step 3: Now go to http://www.alexa.com/siteowners/claim?ax_atid=7a1cf237-f464-4daf-98d6-50ef8b4072a0 to claim your site's ownership.

OR

If the above link is not working then follow below link but replace 101helpervideos.blogspot.com with your site url:

http://www.alexa.com/pro/subscription/claim?site=101helpervideos.blogspot.com

Step 5: Now you will be taken to a page where you have two methods to claim your site's ownership:
  1. Upload an Alexa verification file to your site's root directory.
  2. Add an Aelxa verification  ID to your homepage.
Click on the second one.


Step 6: Now copy your meta verification code.

Step 7: Go to blogger, navigate to template and click on Edit Html.

how to edit html in blogger

Step 8: Paste the copied verification code inside the <head> region of your template like this and click on save template:

alexa site verification blogger

Step 9: Now go back to the alexa verification page and click on Verify my ID.

how to verify a site with alexa blogger 101helper

That's it you will see Your site is successfully claimed.

Also Read: How To Improve Your Blog's Alexa Rank

How To Edit Your Site's Data In Alexa?

Follow below steps to edit your site's data in alexa!

Step 1: Go to Alexa and Login to your account if you are not already logged in.

Step 2: Go to Dashboard and hover Site Management beside site metrics and click on Edit Site Listing.

how to change country in alexa

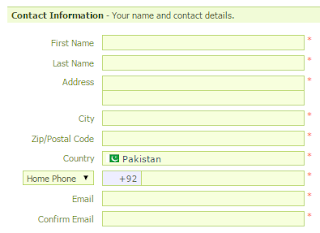
Step 3: Fill out your site's info e.g: Your site's name, description, site's owner name, address, city, contact info etc.

how to verify blogger blog with alexa

Step 4: Choose a country of your rank, it will be shown in your site's info.

how to show your country in alexa

Step 5: Click on save changes and you are done!

Note: It will take about two days to update changes.

You can get more features like comparison between your site and other sites, adding your site's logo etc but for that you have to upgrade your account.

Thanks for visiting 101Helper. Follow and subscribe for more posts. Keep visiting us.

Search Tags: How to add site info in alexa, Improve Alexa rank, Show rank in your country in Alexa, 101 helper alexa rank tips, verify blogger blof with alexa, seo tips and tutorials for blogger 101helper.

Monday, December 21, 2015

How To Earn Money From Adhitz In Blogger

earn money blogging online from AdHitz

PPC(Pay Per Click) is the mostly wanted ad network because it pays for every click you get. Although every ad network say that they have ppc feature but only a few really have this great feature so publishers usually head to ppc ad networks to earn faster and better. One of the best PPC ad network is adhitz. It is online since 2009 and is operated by a well know ptc site, Clixense. It has different rates for different countries and image as well as text ad campaigns. One can earn much better with adhitz than anyother network. Adhitz pays very high rates so it wouldn't be wrong if i say that adhitz is better than Google adsense. Without any doubt Adsense really pay high rates but no one can fit in its criteria of ads placement. Because Google has mentioned in the ads placement policy that ads shouldn't be placed beside any download button, ads shouldn't be placed with a flash image because it grabs the users attention, ads can't be made floating on the page etc. So these rules make it too difficult to earn money from Google adsense because there is no way that you can make your visitors to click on your ads and in normal conditions nobody is going to click ads. Adhitz also has ads placement policy but it doesn't say that you can't place ads near a flash image or in a pop-up. So its easy to earn money with Adhitz.

This post is created to tell you how to earn money from Adhitz and it is also a review of Adhitz so here i will tell you about different countries click rates, Ad types, payment methods, how to register an adhitz account, and how to implement adhitz ads in blogger.

Payment Proof:

I recently cashed out $25 and I got my payment instantly, here is a screenshot of my Paypal account.

paypal-proof-adhitz-publisher-blogger-101helper

So it is proved that Adhitz is a trusted ad network.

Payment Methods:

(1). Paypal(minimum payout is $25).
(2). Payza(minimum payout is $50).

Payout fee is $1.50

Ad Types:

Adhitz has images as well as text ads. Some ad sizes are mentioned below:

Image ads:

adhitz image ads

(1). 300X250 (2). 468X60 (3). 728X90 (4). 125X125.

Text ads:


(1). 300X250 (2). 468X60 (3). 728X90 (4). 125X125 etc


CPC rates for different countries:

Here is the rate chart of adhitz. It shows ppc rates for every country.


How To Create An Account In Adhitz?

Step 1: Go to Adhitz Registration Page.

Step 2: Fill up the sign up form, type your name, city, email, phone number, etc which is asked in the form.


how to register in adhitz

Step 3: Select payment method. Minimum payout rates are mentioned above.


how to register in adhitz 101helper

Step 4: Enter your login details e.g username and password.


how to earn money online blogging

Step 5: Select a security question and type its answer.


how to earn money online fast

Step 6: Finally check the user agreement option and click on create account


earn money blogging

How To Add Adhitz Ads In Blogger?

Its very simple to add adhitz in blogger. All you need is to generate an ad code and implement it in your blog. So lets generate an ad code first and after that we will implement it.

Generating ad code in adhitz:

Step 1: Go to Adhitz and log in to your account.

Step 2: Open publishers panel.


how to generate ad code in adhitz

Step 3: Click on My Ad Zone.


how to generate ad code in adhit

I am creating an image ad so I am switching to image ads creator. Methods are same to create text or image ads.

You can create an ad-product or pay per click ad zone.

Ad-Product: Ad-product is an ad zone which lets advertisers to advertise on your site via your ad zone by paying a specific amount for a whole month, a week, for two days or a single day.

Pay per click ad zone: It is an ad space which lets advertisers to pay for each click they get.

I am creating ppc ad zone here. Creating ad-product is similar to it so if you wish to create an ad-product instead of ppc you can do it by following step 4.

Step 4: Type your cost per click amount, type max number of ads, select ad type, type minimum spend, select if flash ads are allowed on your ad zone or no and finally click on Add.


how to create ad zone in adhitz

Congratulations! you have successfully created your first ad zone.

Step 5: Now click on Generate Code in the menu.


how to generate ad code in adhitz

Step 6: Select an ad type on code generator page, click on save settings and copy the code.


how to get ad code to earn money

That's it! you have created your ad zone and got the code of ad now its time to integrate it in your blog or site!

Adding Adhitz Ads In Blogger?

Placing ads in sidebar or below header:

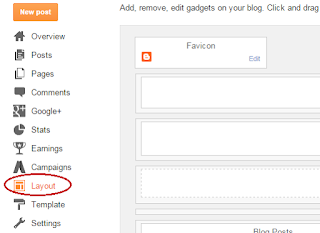
Step 1: Go to blogger dashboard and navigate to layout.

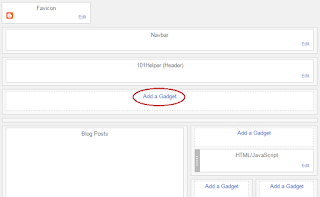
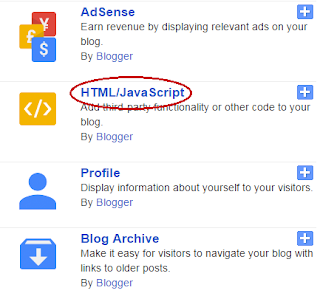
Step 2: Click on add a gadget and click on Html/Javascript.

Step 3: Paste the copied code of ad in the Html/Javascript window.

Step 4: Click on save and you are done.

Placing ads below post header or above post footer in blogger:

Check Out: How to add ads below header and above footer in blogger posts.

I hope you found this post helpful, if yes then recommend it on Google and share it with others. Follow and subscribe to get news about blogging posts in your inbox. Thanks for visiting 101Helper. Keep visiting :)
Search tags: How to earn money from adhitz, how to earn money in blogger,how to earn money online,best ad network for publishers,PPC ads for bloggers,cpc ad network,earn for each click,earn money online from blog.

Friday, December 11, 2015

How To Install Blogger "Featured Posts" Widget

featured posts widget

In the recent update blogger has added a new gadget to help bloggers highlight the posts that matter the most. So with this gadget you can highlight your featured posts or highlight the posts which are too older and don't get enough views and you prefer to tell your blog readers about them so they would get views and your visitors will also be able to reach the posts which you recommend to read. Though this is a good gadget but not better than 101Helper's Featured Posts Widget because you can display only single featured post and 101Helper's Featured Posts Widget lets you to show as many posts as you need. So this post is to show you how to install blogger featured posts widget. Follow below steps to begin!

How To Install Blogger "Featured Posts" Gadget?

Step 1: Go to blogger dashboard.

Step 2: Go to Layout and click on add a gadget.

Step 3: Click on Featured Post below Adsense.


how to install blogger featured posts widget

Step 4:
Make following customizations, you can see a preview of your widget on right side or below widget options:

how to install blogger featured posts widget 101helper

(1). Give A Title To You Gadget: 

Type a title for your widget e.g: featured posts or posts recommended for you.

(2). Post Snippets:

Choose posts snippet options e.g show post title or show post image. Check or uncheck to enable or disable showing post title or image.

(3). Search A Post:

Search for a post or choose labels from which you want to show featured post.

(4). Choose Post:

Click on the post which you want to display.

Step 5: Click on save and you are done! open your blog to see your featured post widget.

You can show your widget vertically as well as horizontally. To show it vertically drag it to sidebar and to show it horizontally drag it above blog post.

Note: This gadget grabs the first image of your post so you can't choose a custom image.

I hope you like this gadget and this post was helpful to you. If you found it helpful share it with others. Like 101Helper on Facebook or follow on twitter to get updates about new blogger gadgets.

Search tags: New blogger gadget,Featured Posts widget, Blogger featured posts widget, show featured posts widget on blogspot,recommended post widget for blogger, 101Helper blogger gadgets.

Friday, December 4, 2015

Slideout Menu For Blogger Mobile Site With Social Buttons

Slideout Menu For Blogger Mobile Site With Social buttons

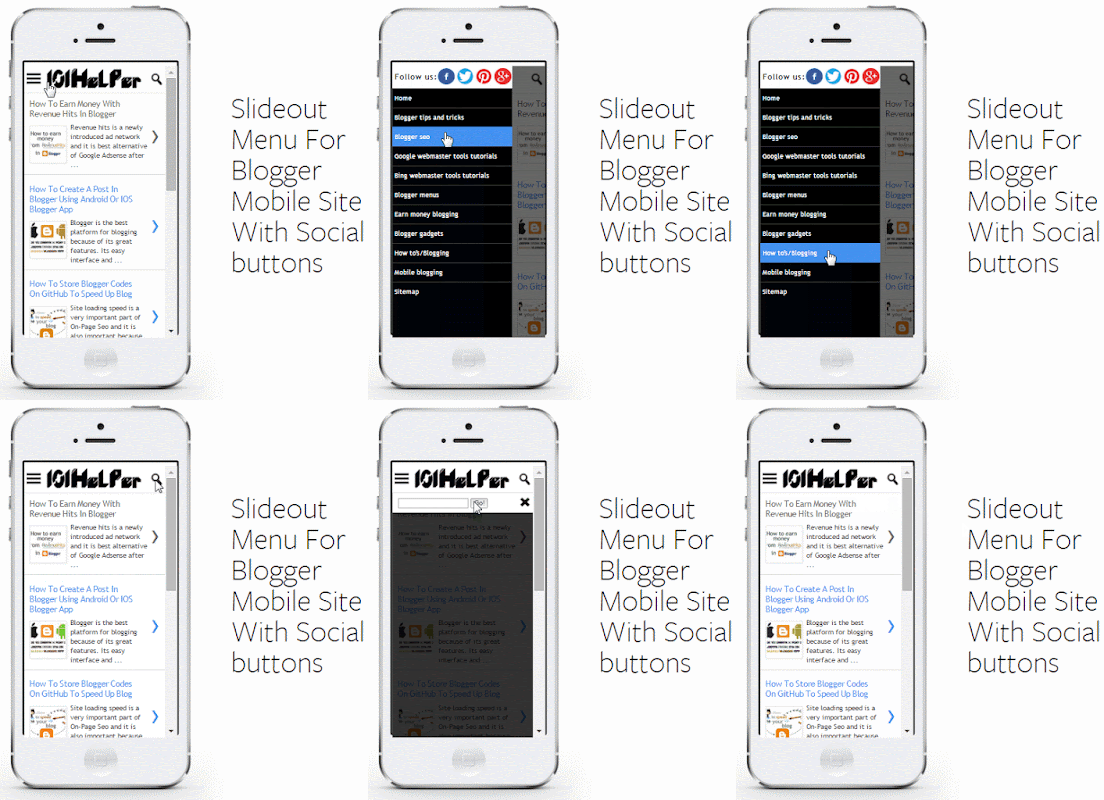
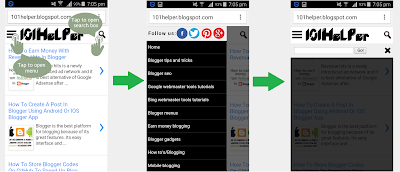
My recent post for mobile blogging was about a slide down menu which is really appreciated by visitors as it got more than 1000 views so I decided to create another menu for blogger mobile site. Slide down menu was too simple and it didn't have other features like social media buttons and search box so I decided to create a menu which have these features and an exiting look. As responsiveness is also very important for a menu so i made it responsive too. You can read its major features below. For a live demo you can visit 101Helper's mobile site. I am sure you'll like this menu. Don't forget to give your feedback by leaving a comment below.

Slideout Mobile Menu Features:

☆ Easy installation.
☆ Responsive design.
☆ Social media buttons ready.
☆ Fast(doesn't affect blog's loading speed).
☆ Low size.
☆ Responsive search box.
☆ Compatible with all smart phones.
☆ Scrollable tabs and floating on page scroll.
☆ It fits all screen sizes(ipad,iphone,tablets etc).
☆ It has space for Logo.

See Live Demo

Screenshot:

slide out menu for blogger mobile site

How To Add Slide Out Menu In Blogger?

Its very easy to install this menu in your blog. You just have to follow below steps. Note that we have to hide blog header in mobile site as this menu has a space for logo so you don't need blog header in mobile site any more so we will hide the header in mobile site too while installing this menu. Lets begin!

Step 1: Go to blogger dashboard and navigate to layout.

how to add a gadget in blogger blog

Step 2: Click on add a gadget below your blog's header in the layout.

`how to add slide out menu in blogger tutorial

Step 3: Click on Html/Javascript.

how to add gadgets and ads in blogger

Step 4: Copy the below code and paste it into Html/Javascript window.
<link rel="stylesheet" type="text/css" href="https://rawgit.com/101Helper/docs/master/slideout-nav-public.css" />
<nav id="nava" role="navigation" class="sticky-nav" style="top: 0px;">
<form id="searchbox" method="get" action="/search">
<input name="q" type="text" id="search-in" size="19" required />
<input name="m" type="hidden" value="1" />
<button type="submit"  class="_54k8 _56bs _56b_ _56bw _56bu"  id="u_0_1" data-sigil="touchable"><span class="_55sr">Go!</span></button>
<img id="hide-search" src="https://blogger.googleusercontent.com/img/b/R29vZ2xl/AVvXsEgpHalgGA3vjkyB3E4m_UYKDnIWklkz4VuHW49I5ZhFNu9tzOnnSFbCNE630XuuilUgSzc8fmmRPtwDf6rilvW0kjiYDSp8vHp3gseLbaiivVxq1i7GO1ZlDPDZ7Na6KzGKOYtx515q05g/s1600/rsz_close-icon.jpg" />
<div id="search-height"></div>
</form>
<div class="prl-container">
<div class="nav-wrapper clearfix">
<img id="show-search" src="https://blogger.googleusercontent.com/img/b/R29vZ2xl/AVvXsEiLUybtpDUZOn_p-T4dEyAlyCKycV01OrFFv1pF4wr_c_j3KOm9IZiwpdVzh50TEmjMtUf8DAm2SWK41JnQzQwwYN4iAh6VNVFTfSR_St4gguB2LJLS9EjUHpcKETiuv6GOUUhFEfNtjvE/s1600/rsz_search-icon.png" />
<div style="float:left;">
<div class="nav_menu_control"><a href="#" data-prl-offcanvas="{target:'#offcanvas'}"><img src="https://blogger.googleusercontent.com/img/b/R29vZ2xl/AVvXsEipPzNqIJhw1aUO73NWaAEZOGg01PoJb5j_a4zd2cWAs48RhRf3SRoc3-H3vJr6X9gcs9uunnXNnUVTivxlkyOiJ_jw178P39FoqKVtwQR21-aWEt95lYs-p_C5COWlDtZAE5Z2jj9fOpg/s1600/rsz_mobile-menu-icon.png"/></a></div>
</div>
<div class="container">
<div class="left">
<a href="/?m=1"><img src="https://blogger.googleusercontent.com/img/b/R29vZ2xl/AVvXsEiIVYG0lxLLOwBdlzzaiN_Z9swg1qSJq5fqaHOZf1p4BZVK73xF7qjh0IaY4SFaAXsRndmYdun6rShv3nKDn8YTRbJXiaBLMld0mdFOqPwU2AGVO5vXEhRCOB30FYYWoseMLA2P-Uqo9tU/s1600/rsz_1101helper.png" class="logo" alt="101Helper"/></a>
</div>
<div class="clear"></div></div></div></div></nav><div style="clear: both;"></div>

 <div id="offcanvas" class="prl-offcanvas">
<div class="prl-offcanvas-bar">
<div class="social-icons" style="padding-top: 5px;background: #fff;padding-left: 5px;">
<p>Follow us:</p>
<a href="https://www.fb.com/pages/101Helper/623626157780837"><img border="0" src="https://blogger.googleusercontent.com/img/b/R29vZ2xl/AVvXsEjWogpYzeu5YP8RTsZzglGivuNTTu9J2Vs1HViyapw9sEc0c5kLQCOFKy8e-ob85iwc3Z90WkTflc3a96F7lOizfdYwBKQrALonqGoLNHKek34ww9fnWepAXt6Hn9HQG1tdARk4SlnZVYc/s1600/facebook.png" /></a>
<a href="https://twitter.com/101helperblog"><img border="0" src="https://blogger.googleusercontent.com/img/b/R29vZ2xl/AVvXsEgd6vJ1yEbYxX8Qy1Jm5CfwoIgvkCjOnC2ksB6IwTv7MtMdSmj2ril4MFbQLBzUCgRKM5CffrkDcgiaMciHvub6wH8XIpPqqExxGAMGvNmVS_f1tE5qMc71zYYUGtNucwVqDsPts9EdKYo/s1600/Twitter-Logo.png" /></a>
<a href="https://www.pinterest.com/101helper"><img border="0" src="https://blogger.googleusercontent.com/img/b/R29vZ2xl/AVvXsEjjnMhwZzVE5RlBRc62J8YobWSt1Is0Z4eKK5kzrT7uhMsa2Y3scoK8M-NOJVccUCW3CNDB6sOcTPOJsG_b3fXtIrE9wc9NMtzIS-H5-aiaHq8dNMNXEE6o_mxJdWUiAYoYskgrUgmyaE4/s1600/App-Pinterest-icon.png" /></a>
<a href="https://plus.google.com/+101helperBlogspot"><img border="0" src="https://blogger.googleusercontent.com/img/b/R29vZ2xl/AVvXsEjxl0Py8q_KNLF3AxWvpx74HtLz3JT13D8PAhTbdp074h1ETvC1RMv6RvjTbWjSQMboS-_34brb22U4ve1p5QVGNk7WWeJUgZU5jxqeVGxfhIbfE5qH46TYqCOzGWqZVOsRnaTW6Z1P_Es/s1600/rsz_circle-google-plus-128.png" /></a>
</div>
<nav class="side-nav">
<ul id="nav-list" class="nav-list">
<li><a href="/?m=1">Home</a></li>
<li><a href="/search/label/Blogger%20Tips%20And%20Tricks?m=1">Blogger tips and tricks</a></li>
<li><a href="/search/label/Blogger%20Seo%28Search%20Engine%20Optimization?m=1">Blogger seo</a></li>
<li><a href="/search/label/Google%20Webmaster%20Tools%20tutorials?m=1">Google webmaster tools tutorials</a></li>
<li><a href="/search/label/Bing%20Webmaster%20Tools%20Tutorials?m=1">Bing webmaster tools tutorials</a></li>
<li><a href="/search/label/Blogger%20menus?m=1">Blogger menus</a></li>
<li><a href="/search/label/earn%20money%20blogging?m=1">Earn money blogging</a></li>
<li><a href="/search/label/Blogger%20Widgets%20And%20Gadgets?m=1">Blogger gadgets</a></li>
<li><a href="/search/label/Beginner%20to%20blogging?m=1">How to's/Blogging</a></li>
<li><a href="/search/label/Mobile%20Blogging?m=1">Mobile blogging</a></li>
<li><a href="/p/menusitemap.html?m=1">Sitemap</a></li>
<a class="abt" href="https://101helper.blogspot.com/"><img src="https://blogger.googleusercontent.com/img/b/R29vZ2xl/AVvXsEhNCiXs4iYxtgcPnGw3YBWa0BuC9D9YLF9pGel35ArmwSmbxb6YNQkbKAay4rdiivS8b5i07Zoh1PDhyphenhyphenAmanKFWGy0HqYyRYE0v4PeCTUpswGU9FswIG1sWq6eyOHQ_rILHkWyF3r5LKmLs/s1600/abt.png"/>101Helper</a>
</ul>
</nav>
</div></div>
<script type='text/javascript' src='https://rawgit.com/101Helper/docs/master/slideout_mobile_menu.js'></script>
<script src="https://ajax.googleapis.com/ajax/libs/jquery/1.11.3/jquery.min.js"></script>
<script type='text/javascript' src='https://rawgit.com/101Helper/docs/master/slideout_mobile_menu.js'></script>
<script>
$(document).ready(function(){
    $("#hide-search").click(function(){
        $("#searchbox").hide();
    });
    $("#show-search").click(function(){
        $("#searchbox").show();
    });
});
</script>
<div id='menu-height'/></div>

Step 5: Replace the highlighted piece of code with your blogs info eg:
  • Replace green color links with your fan pages links.
  • Replace orange color link with your blog's logo image link.
  • Make changes in tabs e.g change links and text of your menu tabs - (Highlighted with yellow color).
Note: You can see a link in the menu highlighted with red color, don't try to remove it its against 101Helper Copyright Policy, if found your blog will be reported for copyright violation and action will be taken.

<a class="abt" href=""><img src="https://blogger.googleusercontent.com/img/b/R29vZ2xl/AVvXsEhNCiXs4iYxtgcPnGw3YBWa0BuC9D9YLF9pGel35ArmwSmbxb6YNQkbKAay4rdiivS8b5i07Zoh1PDhyphenhyphenAmanKFWGy0HqYyRYE0v4PeCTUpswGU9FswIG1sWq6eyOHQ_rILHkWyF3r5LKmLs/s1600/abt.png"/>101Helper</a> // Copyright link ---- Don't remove this!

Step 6: Click on save button.

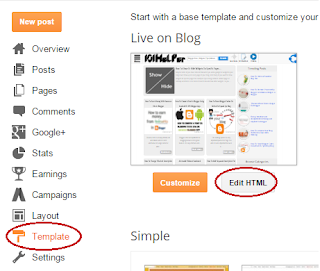
Step 7: Go to template and Edit html.

how to edit html in blogger

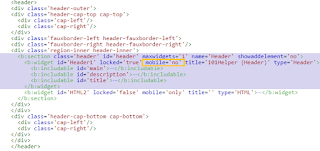
Step 8: Jump to header and type mobile='no' after locked='true' as shown in below image:

how to hide header in blogger

Step 9: Search for the id of your mobile menu gadget and find it in your template.

Check out: How to find ID of a gadget in blogger

Step 10: After finding your mobile menu gadget in your templae type mobile="only" after locked='true' as shown in below image.

how to show gadgets in blogger mobile site

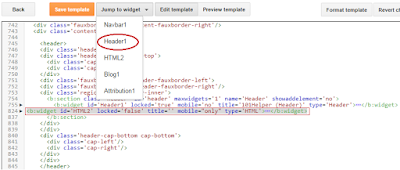
Step 11: Now cut the mobile menu gadget and paste it below header as shown in below image. This is the most important step if you skip it or don't do it right your menu tabs will be irregular. You have to do it in two steps see below images for instance.

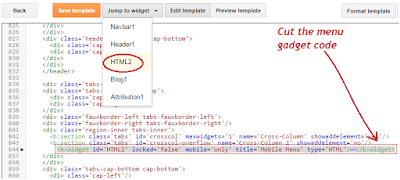
Step A: Jump to your menu gadget by its id and cut menu gadget code:


slide out menu in blogger

Step B: Jump to header and paste the copied code below it:

slide out menu in blogger 101helper

Step 11: Click on save template and you are done!


WATCH MORE BLOGGING VIDEOS!

Open your blog in your phone and check if your menu is working fine or not. If you have any question or confusion ask me in comments or contact me at fahimraza101@gmail.com. If you found this post helpful please recommend it on Google and share it with others. Thanks for visiting 101Helper. Keep visiting us. Follow and subscribe to stay updated.
Search tags: responsive menu css,jquery,slide out menu ios,android,slide out menu for website,blogger slide out menu, mobile site navigation 101helper,menus for blogger

Tuesday, November 17, 2015

How To Earn Money With Revenue Hits In Blogger

how to earn money from revenue hits in blogger

Revenue hits is a newly introduced ad network and it is best alternative of Google Adsense after Infolinks. It is not better as Adsense but it is not less in any way. If you have only 100 views per day you can earn good with Revenue Hits. It has all types of banners and mobile ads too. CPM as well as CPC rates are also high. Apart from it you have opportunity to refer people using your link. Revenue hits says that you can earn upto $100 per referral. It have all types of referral banners too. After personally reviewing it I recommend it for publishers. This post is a review of revenue hits and a tutorial about how to use revenue hits to earn money via blogger blogs.

Features(Review):
  1. High CPM rates.
  2. All size banners are available.
  3. High CPC rates.
  4. Pop-up and bounce ads.
  5. Earn $10 to $100 for referrals.
  6. Slide out and shadow ads available.
  7. No minimum traffic required.
  8. Perfect traffic and click tracking analytics.
  9. Worldwide coverage.
  10. Fast account activation.
  11. Easy to setup ads.
Payment Methods And Minimum Payout Threshold:

You can payout with Paypal, Payoneer and Wire. Minimum payout threshold is $20 for Payoneer and Paypal while $100 for wire transfer.

How To Sign Up?

Step 1: Go to Revenue Hits.

Step 2(Site/App Information):

Type your site name, url, description, select type as website and select category of your site.

how to sign up for revenue hits account

After filling up all the info click on Continue.

Step 3(Partner Information): 

On the second page type your username, first and last name, your email and password. You can also enter your skype name but it is not required.

You can also type a referral name, as I told you about revenue hits type fahimraza001. It won't affect your blog's revenue and I will get a bonus from revenue hits.

how to sign up for revenue hits account step 3

Step 4: Set your Payment type as decide later or if you want to set your paypal account or payoneer account select it and fill out details.

how to earn money online from home blogger blog

Step 5: Scroll down and click on "I agree to these terms and conditions".

how to earn money online

Step 6: Finally confirm your account by going to your Email > Inbox > Revenuehits Team. Click on the link in the email you just received and open it to activate your account.

earn money online fast

How to add revenue hits ads in blogger?

Step 1: Go to Revenue hits and login to your account.

Step 2: Click on "New Placement" on the right side of the page and choose the "Desktop Placement".

how to place ads in blogger blog blogspot

Step 3: Select your placement type from the given options e.g banner, shadow ad, slider, top bar, pop-under etc.

how to earn money blogspot

Step 4: Customize your ad and click on save.

Step 5: Preview your ad by clicking on an eye's icon to see your ad. Just beside it click on </> to get your ad's code.

how to get ad codes to earn money

Step 6: Copy the code and go to blogger dashboard.

Step 7: Navigate to "Layout" and click on "add a gadget".

Step 8: Click on Html/Javascript and paste your ad code.

how to add gadgets and ads in blogger

Step 9: Click on save and you are done. Open your blog to see your ads.

You can also create ad campaigns for your mobile site. Just choose mobile placemen in the step 2 and follow other steps as they are.


How To Disable Revenuehits POP-UP & Bounce Ads?

As you know that pop-up ads affect your site performance and user experience so most of publishers prefer to disable pop-up ads. In revenue hits there are two types of extra ads which boosts your revenue but affect the user experience too. One of these ads are pop-up ads and everybody knows what is a pop-up ad but the second one is bounce ads which is a new thing. Bounce ads are the ads which show up you go back to a page. It also affects users experience to some extent but not as much as pop-up ads. So here I'll show you how to disable pop-up and bounce ads in revenue hits.

Note: Disabling pop-up and bounce ads may reduce your revenue but it improves user experience!

Step 1: Go to Revenue hits and log-in to your account.

Step 2: Navigate to Account > Preference > Extra tag.

how to disable pop-ups and bounce ads in revenue hits

Step 3: Uncheck the ads which you want to disable

I hope this post helped you and you have setup your ads successfully. If you found this post helpful please let me know by leaving a comment below and also share it with others. If you have any suggestion you can tell me by contacting me. Thanks for visiting 101Helper.

Search Tags: How to add ads in blogger,how to place ads in blogspot,how to earn money online from home by blogging,create a free website to earn money,how to use revenuue hits,boost your blog's earnings

Wednesday, November 11, 2015

How To Create A Post In Blogger Using Android Or Ios Blogger App

how to create a post in blogger

Blogger is the best platform for blogging because of its great features. Its easy interface and alot of features makes it better than others. Currently blogger has millions of users because of its best service. One of the greatest features of blogger is its smart phone app which is introduced to let users write posts from their smartphones anywhere anytime. Unfortunately blogger smartphone app is available only for Android and IOS so if you are using Microsoft phones or other phones which don't support Andoid apps then you can't use this app.

Features:

Create, save, delete and publish  your post from your smartphone.

Add images, links and bold or italic your text. More tools aren't available yet.

View your blog as well as draft posts.

In this post i will tell you how to use Blogger app in your smartphone to create a post. First we have to download the blogger app so follow below steps to download your app.

Step 1: Open App Store or Play Store in your phone.

how to download blogger app in samsung or iphone

Step 2: Search for blogger app and install it.


Step 3: Open your app and sign in using your blogger account or if you are already logged in then choose your account.

how to use blogger app

Step 4: Choose your blog in which you want to write post as shown in below image:

how to use blogger app 101helper

Step 5: On the top of the app click on a "PENCIL" icon.

how to write post in blogger

Step 6: Type your post's title, type labels to see predictions of your existing labels, select location from where you are writing post or deny location by clicking on a close icon beside it and finally click on the post content to start writing your post.

how to create a post in blogger using android app

That's it. You have successfully learnt "how to write posts in blogger using blogger smartphone app".

You may have following questions:

》How to make some text bold or italic?

Well its very easy to bold or make some test italic. Just click on the "B" icon or "I" on top of the editor to bold or make text italic.

how to make text bold or italic in blogger

》How to add images in posts?

You can see a camera icon beside your post title, tap it to put images inside your post. You can directly take images or upload them from gallery.

How to add images in blogger app

You may see an error while uploading an image and in that case try another trick to put images in your post. Whats the trick? Well its simple collect images which you want to add in your post and upload them before writing content. Didn't get me? Follow below steps:

Step 1: Go to your gallery and select the images which you want to add in your post.

how to add images in blogger posts

Step 2: Click on share and choose blogger.

how to use blogger app android or ios


That's it. Now write your post and manage the uploaded images.

》How to add links in posts?

Just like bolding text or making text italic you can add a link in your post. Just select the text which is to be link. Now click on link icon beside italic text icon on the top of the app. For instance see below image.

how to add links in blogger post or blogger app

》How to save or delete a post or edit a post?

Saving a post is much easier than writing it. First write your post and click on Done.
Now click on save icon beside an arrow(publish button) on the top right side of the app.

how to save publish or delete a post in blogger

Similarly to delete a post click on three vertical dots beside the save button.

To edit a post select it and click on the Pencil icon to edit it.

I hope you like this post and you found it helpful. If it was helpful to you leave a feedback below and must share it with others. Follow and subscribe to get latest blogger tips, tricks and mobile blogging tutorials in your inbox.

Search tags: How To Create A Post In Blogger Using Android Or IOS Blogger App,blogger ios and androind app,how to add images in blogger app without errors,mobile blogging tutorials 101helper.blogspot